Windows
FlexxAgent supports 64-bit Windows operating systems; it cannot be installed on 32-bit systems. The installation binary is available with or without a graphical interface, so it supports both unattended deployment methods and installation via wizard.
Service Architecture
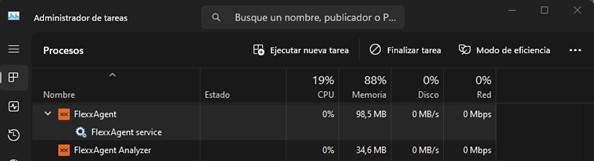
FlexxAgent consists of a Windows service named FlexxAgent Service, which coordinates two processes:
- FlexxAgent, executed at the system level
- FlexxAgent Analyzer, started for each user session.
This architecture allows FlexxAgent to manage devices with multiple sessions (such as terminal servers, Citrix, or AVD) and obtain detailed metrics to enhance diagnostic capabilities.
Example:
- On a laptop, FlexxAgent (at the system level) and FlexxAgent Analyzer (under the user's identity) run.
- On a device with multiple sessions, besides FlexxAgent, a FlexxAgent Analyzer process will run for each session.
Consumption
FlexxAgent is optimized to minimize resource usage. The approximate values are:
- Disk space: < 200 MB
- CPU: < 0.5%
- RAM: 100-200 MB
FlexxAgent Process (system)
- Collection of performance information, hardware, sessions, profiles, disks, partitions, and Windows services: every 60 seconds.
- Sending event log error events: every 10 minutes.
- Updating user profile information: every 15 minutes.
FlexxAgent Analyzer Process (user)
- Analyzes application usage, diagnostic data, and user experience.
- Local data collection: every 15 seconds.
- Sending reports to the service: every 5 minutes (this metric may change in specific functionalities).
Supported versions
FlexxAgent is compatible with Windows operating systems currently in support cycle by Microsoft. Although it can be installed on unsupported versions, some features might not be available.
Full Compatibility
- Microsoft Windows 10 or later
- Microsoft Windows Server 2016 or later
Limited Compatibility
- Windows 7 SP1
- Windows 8.1 SP1
- Windows Server 2008 R2 SP1
- Windows Server 2012
Software Requirements
FlexxAgent requires the following components:
- .NET Framework 4.6.2 or later (recommended: .NET Framework 4.8).
- Windows PowerShell 4.0 or later (recommended PowerShell 5.1).
- Note: The execution policy for Azure PowerShell must be set to Unrestricted.
Considerations for Windows versions in EOL
On End-Of-Life (EOL) systems, FlexxAgent may exhibit limitations or lack of compatibility with certain features.
Unsupported Features
When using FlexxAgent on older Windows operating systems that are out of support, the following features are not supported:
- Collection of GPU consumption metrics.
- Flow execution.
- Execution of microservices by the end user.
- Obtaining information from storage units.
- In the case of virtual devices, detection of broker and hypervisor (limited according to provider).
- User Input Delay (UID) (only available from Windows Server 2019 and Windows 10 version 1809).
Mediator detection may not work for everyone. There is no user input delay performance data as this counter does not exist in Windows 7 or Windows Server 2008 R2.
Windows 7 and 2008 R2
FlexxAgent can be installed on Windows 7 x64 or Windows Server 2008 R2 SP1 under the following conditions:
- Install the update KB4474419: (SHA-2 code signing support update for Windows Server 2008 R2, Windows 7, and Windows Server 2008: September 23, 2019).
- Install the update KB3140245: (Update to enable TLS 1.1 and TLS 1.2 as default secure protocols in WinHTTP in Windows) and follow the instructions in the How to enable TLS 1.1 and TLS 1.2 as default secure protocols in WinHTTP in Windows section of the Microsoft support page.
- Requires at least .NET Framework 4.6 (recommended: 4.8).
- PowerShell 2.0 with Windows 7 is not compatible with TLS 1.2; install Windows Management Framework 5.1, which includes PowerShell 5.1.
Windows 8 and 2012
FlexxAgent installation supports Windows 8 under the following conditions:
- Requires .NET Framework 4.6.2 (Microsoft blocks the installation of later versions on Windows 8.0).
- All Windows security updates must be applied to ensure compatibility with TLS 1.2 and SHA-2 code signing.
Download
BINARY WITHOUT GRAPHICAL INTERFACE
Steps to download:
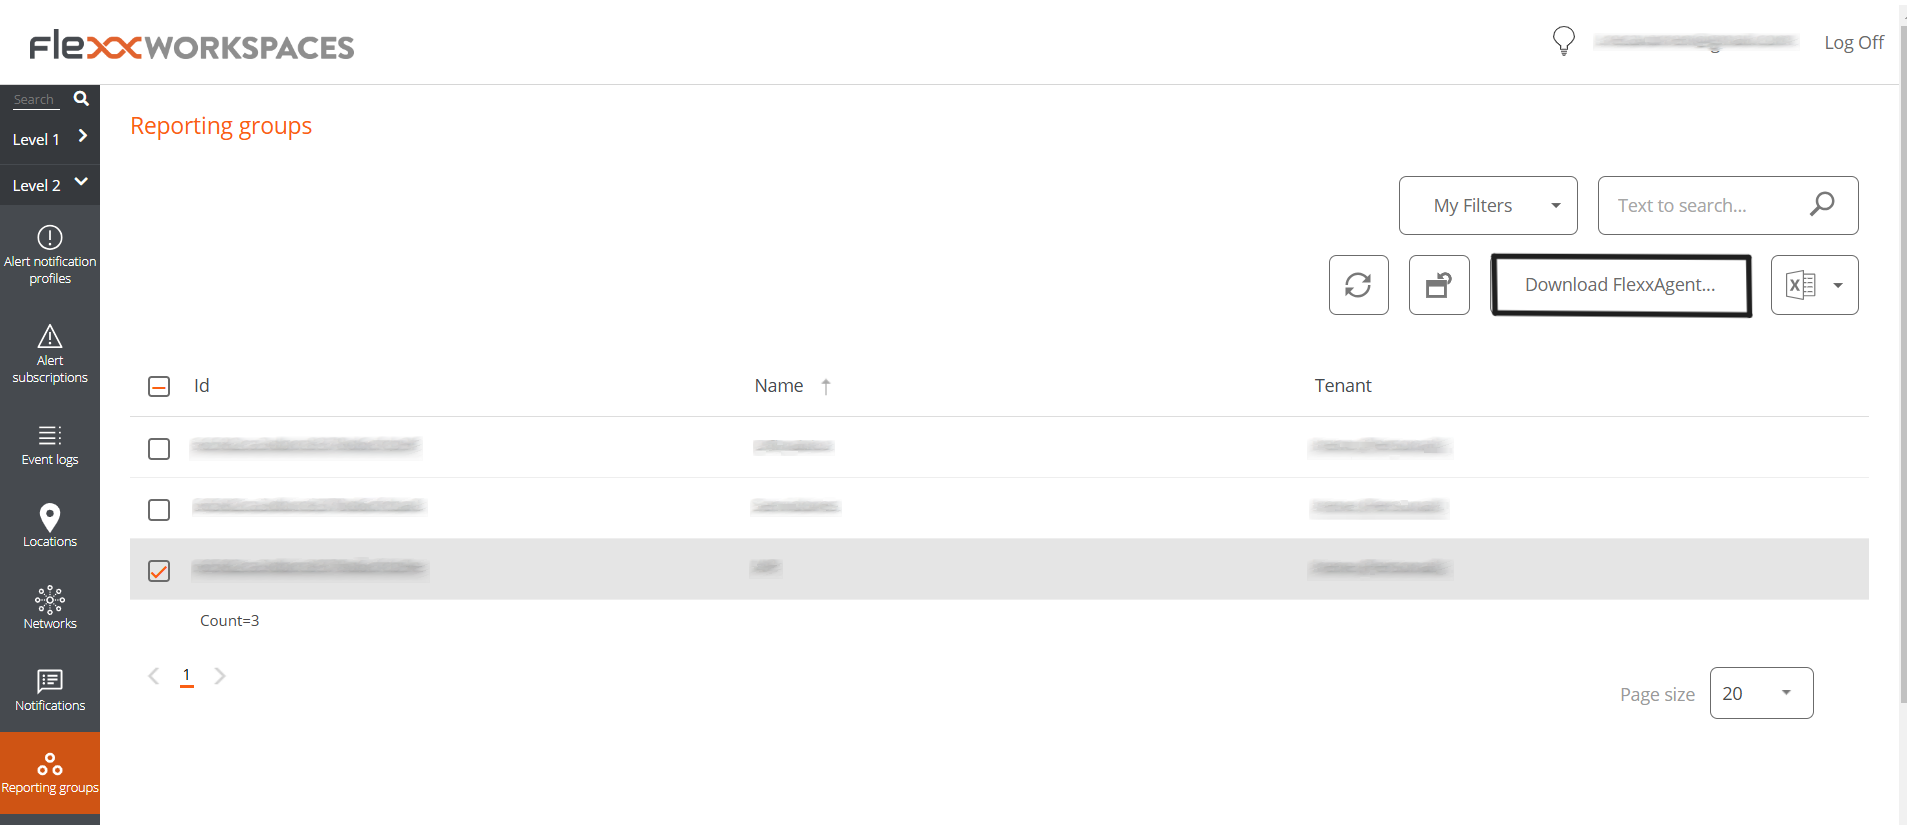
-
Access
Workspaces->Level 2->Report Groups. -
In list view, select the reporting group you want to download the agent for and click
Download FlexxAgent.
- A window will open with the
Generate standalone installer (offline)option, to download the FlexxAgent installer:
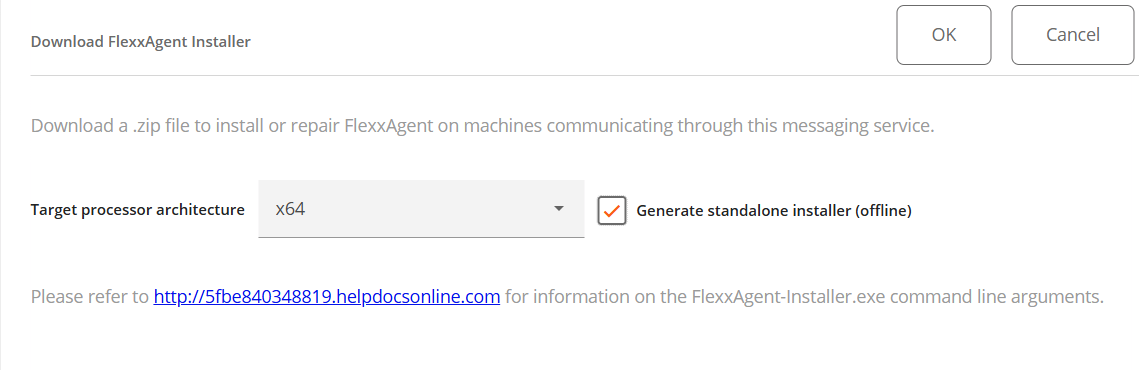
-
If the option is selected: during installation, the binary will not require internet access for checking or downloading binaries.
-
If not selected: the minimal installation package will be downloaded, which will access the internet to obtain the latest binaries.
Unattended Deployment
FlexxAgent supports unattended deployment via GPOs, Intune, SCCM, or other distribution tools.
Installation
The unattended installation of FlexxAgent is done via PowerShell.
Start-Process "<ruta>\FlexxAgent-Installer.exe" -ArgumentList "<agregar parámetro>" -WindowStyle Hidden -Wait
Supported Parameters
| Parameter | Type | Caption | |
|---|---|---|---|
| proxyAbsoluteUri | [string] | Proxy URL and port. | |
| proxyUser | [string] | User for authenticated proxy. | |
| proxyPass | [string] | Password for authenticated proxy. | |
| proxyPersistConfig | [switch] | If specified, the configuration is persisted in the registry. | |
| configFilePath | [string] | Alternative directory for the FlexxAgent-Configuration.conf file. | |
| DebugMode | [switch] | When specified, creates a text file in the same folder with the script execution transcription. | |
| RepairAgent | [bool] | Removes the preexisting configuration of FlexxAgent when it is reinstalled on a device. | |
| Help | [switch] | Lists the supported parameters, with type and description. |
Uninstall
To uninstall FlexxAgent unattended:
"C:\Program Files\Flexxible\FlexxAgent\VDIServiceUpdater.exe" /Uninstall "C:\Program Files\Flexxible\FlexxAgent\FlexxAgent.exe" /quiet
The Windows installer does not remove all files, folders, keys, or registry values created during the installation. For a clean system image, you can manually remove:
Files
C:\Windows\Prefetch\FLEXXAGENT.EXE-XXXXXXXX.pf– where XXXXXXXX is a string of letters and numbersC:\Windows\Temp\FlexxAgentInstallation.log
Folders
C:\Program Files\FlexxibleC:\ProgramData\Flexxible
Reinstallation
To reinstall FlexxAgent on a device, removing its previous configuration must run:
FlexxAgent-Installer.exe -repairAgent
For example:
Start-Process "<ruta>\FlexxAgent-Installer.exe" -ArgumentList "-repairAgent true" -WindowStyle Hidden -Wait
Uninstallation Protection
This functionality prevents a user from uninstalling FlexxAgent. The configuration can be applied at the Product level or Report group level.
Requirements
- The configuration can only be performed by a user with the Organization Admin role.
- Minimum version of FlexxAgent: 25.4.2.
This functionality is disabled by default.
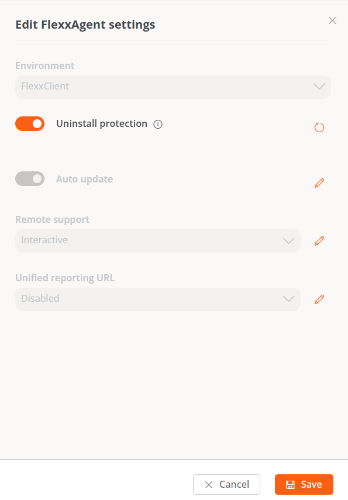
Configuration at Product Level
- Go to
Portal->Settings->Organization. - In the menu, select the
Productstab. - In the table, choose the environment where you want to execute the functionality, and in the
Actionfield click onAgent Settings. - In the form, enable or disable the
Uninstallation Protectionbutton. - Click on
Save.
Configuration at Reporting Groups Level
The feature can be executed on one or several reporting groups.
Enable protection for a reporting group
- Go to
Portal->Settings->Reporting Groups. - In the table, choose the reporting group where you want to execute the functionality, and in the
Actionfield click onAgent Settings. - In the form, edit the
Uninstallation Protectionfunctionality (pencil-shaped button) to choose between enabling or disabling it. - Click on
Save.
Report groups inherit settings made at the Product level; however, they can override their own settings.
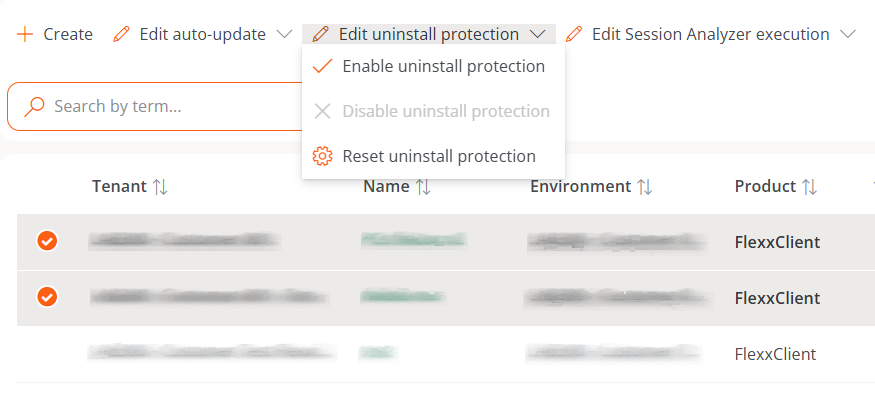
Enable protection for multiple reporting groups
- Go to
Portal->Settings->Reporting Groups. - In the table, select the reporting groups where you want to execute the functionality.
- Click on
Edit uninstallation protection. Three options will be displayed:
- Enable uninstallation protection. Protects the reporting groups against uninstallation of FlexxAgent (this option will not be available if the feature is already enabled in Product).
- Disable uninstallation protection. Allows users to uninstall FlexxAgent (this option will not be available if the feature is already disabled in Product).
- Reset uninstallation protection. Applies the configuration that the Product has to which the report group belongs, whether enabled or disabled.
A device will have FlexxAgent Uninstallation Protection enabled in the following cases:
- The feature is enabled in the reporting group to which it belongs.
- The feature is deactivated in the reporting group (it is neither enabled nor disabled), but it is enabled at the Product level.
Ways to uninstall FlexxAgent with protection enabled
If a user has the feature enabled but needs to uninstall FlexxAgent, they will have two options:
- Move the device to a reporting group that does not have protection enabled.
- Via a token:
- Go to
Portal->Workspacesand select the device. - Execute the action
Reveal uninstall tokenwhich will display a unique token for that device valid until 23:59:59 UTC the next day. - Go to the Windows Control Panel and uninstall FlexxAgent by entering the token.

Before managing the uninstallation of FlexxAgent through tools like Intune or custom scripts, move the desired devices to a reporting group that does not have protection enabled.
Flexxible recommends having a reporting group with Uninstall Protection disabled to facilitate the uninstallation of FlexxAgent on devices.
Known Issues
FlexxAgent installation
Issue 1 - Windows Management Instrumentation (WMI)
If the device has issues caused by the Windows Management Instrumentation (WMI) service during installation or reinstallation, the process may report these errors in the CMD window:
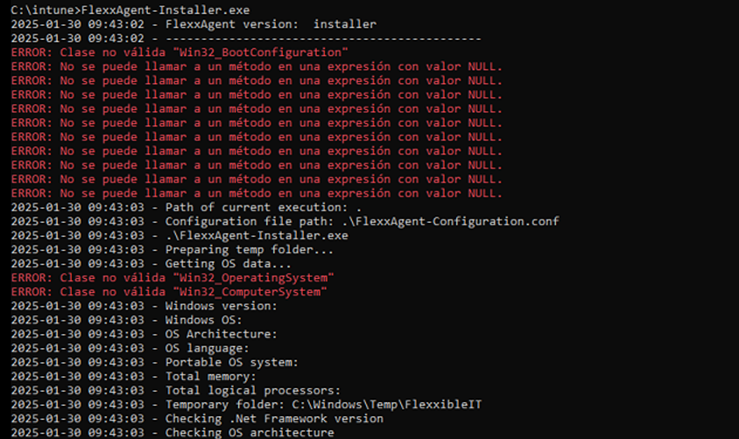
Solution
Run the following commands:
Stop-Service winmgmt -Force
winmgmt /resetrepository
Start-Service winmgmt
Issue 2 - PowerShell process restriction
Some security solutions do not allow the installation and/or self-update of FlexxAgent to be performed effectively. The installer might return the message:
The process was terminated with errors. A corrupted installation was detected due to external processes. This is usually caused by antivirus activity. Please check your antivirus settings.
Solution
Exclude the following files:
C:\Windows\Temp\FlexxibleIT
C:\Windows\Temp\UpdateFlexxAgent.ps1
FlexxAgent uninstallation
Issue - FlexxAgent remains in the service list
It might occur that FlexxAgent still appears in the list of services, even though it has been uninstalled and all files have been deleted. This would prevent reinstallation.
Solution
Run the following command as administrator in the CMD window:
sc delete "FlexxAgent service"
Then, restart the device.
Proxy Configuration
FlexxAgent supports transparently configured proxies at the system level, with or without authentication. Proxy configuration can be done via the command line or by modifying registry keys that control this configuration.
Proxy Configuration via Command Line
Installation with parameters:
FlexxAgent-Installer.exe -proxyAbsoluteUri ip.ad.dre.ss:port -proxyPersistConfig:$True
Where ip.ad.dre.ss:port corresponds to the IP or DNS and the proxy port.
Or including credentials:
FlexxAgent-Installer.exe -proxyAbsoluteUri ip.ad.dre.ss:port -proxyUser ProxyUserName -proxyPass ProxyUserPassword -proxyPersistConfig:$True
FlexxAgent may not have access to the proxy applied in its configuration if it is outside the corporate network. To determine its accessibility, FlexxAgent tries to resolve the DNS record and makes a TCP request to the corresponding port. If the proxy is not accessible, FlexxAgent will report it directly (without proxy).
Proxy Configuration through Registry Keys
The registry keys that store the proxy configuration are located in:
Computer\HKEY_LOCAL_MACHINE\SOFTWARE\Policies\Flexxible\FlexxAgent\Communications
Registry keys related to the proxy configuration:
Key Proxy_URL
- Path:
HKEY_LOCAL_MACHINE\SOFTWARE\Policies\Flexxible\FlexxAgent\Communications - Name: Proxy_URL
- Type: REG_SZ
- Supported values: the URL and port; for example 'http://192.168.1.1:3128' or 'https://192.168.1.1:3128'
Key Proxy_User
- Path:
HKEY_LOCAL_MACHINE\SOFTWARE\Policies\Flexxible\FlexxAgent\Communications - Name: Proxy_User
- Type: REG_SZ
- Supported values: the username to authenticate to the proxy; for example 'Administrator'. It can be bypassed for unauthenticated proxies.
Key Proxy_Pwd
- Path:
HKEY_LOCAL_MACHINE\SOFTWARE\Policies\Flexxible\FlexxAgent\Communications - Name: Proxy_Pwd
- Type: REG_SZ
- Supported values: The password to authenticate to the proxy. It can be bypassed for unauthenticated proxies.
The value of the Proxy_Pwd key can be set in plain text (not recommended) or base64 encoded and enclosed by «&&&».
For example: &&&VGhpc0lzTjArQCQzY3VyZVBAJCR3MHJk&&& for the “Proxy_Pwd” value.
In either case, FlexxAgent encrypts the value as soon as it starts or attempts to transmit information. You can generate a Base64 encoded string from https://www.base64encode.org/.
Since FlexxAgent triggers a process at the system level (FlexxAgent.exe) and another at the session level (FlexxAgent Analyzer.exe), it may be necessary to define different proxy types for each, depending on how the proxy acts at one level or another.
The Proxy Type can be defined from the FlexxAgent Settings in Products.
Manual Update
To update FlexxAgent manually:
- Go to
Workspaces->Level 1->Workspaces->Operations->FlexxAgent->Update FlexxAgent.
-
The different installed versions are in the dropdown option for
My filters -> Predefined filters -> FlexxAgent version summary. This will generate a view of all devices grouped by version. -
Once the update operation is executed, a Job with all the details of the operation will be generated in the corresponding section.
Logs
Logs provide information and help diagnose issues during installation.
Installation and update logs
Location:
C:\Windows\Temp\Flexxible
Contains information on the installation or update process, dependencies, and process details.
FlexxAgent Analyzer logs
Location:
%LOCALAPPDATA%\FAAgent\Logs
They can be configured to include or not information by criticality levels.
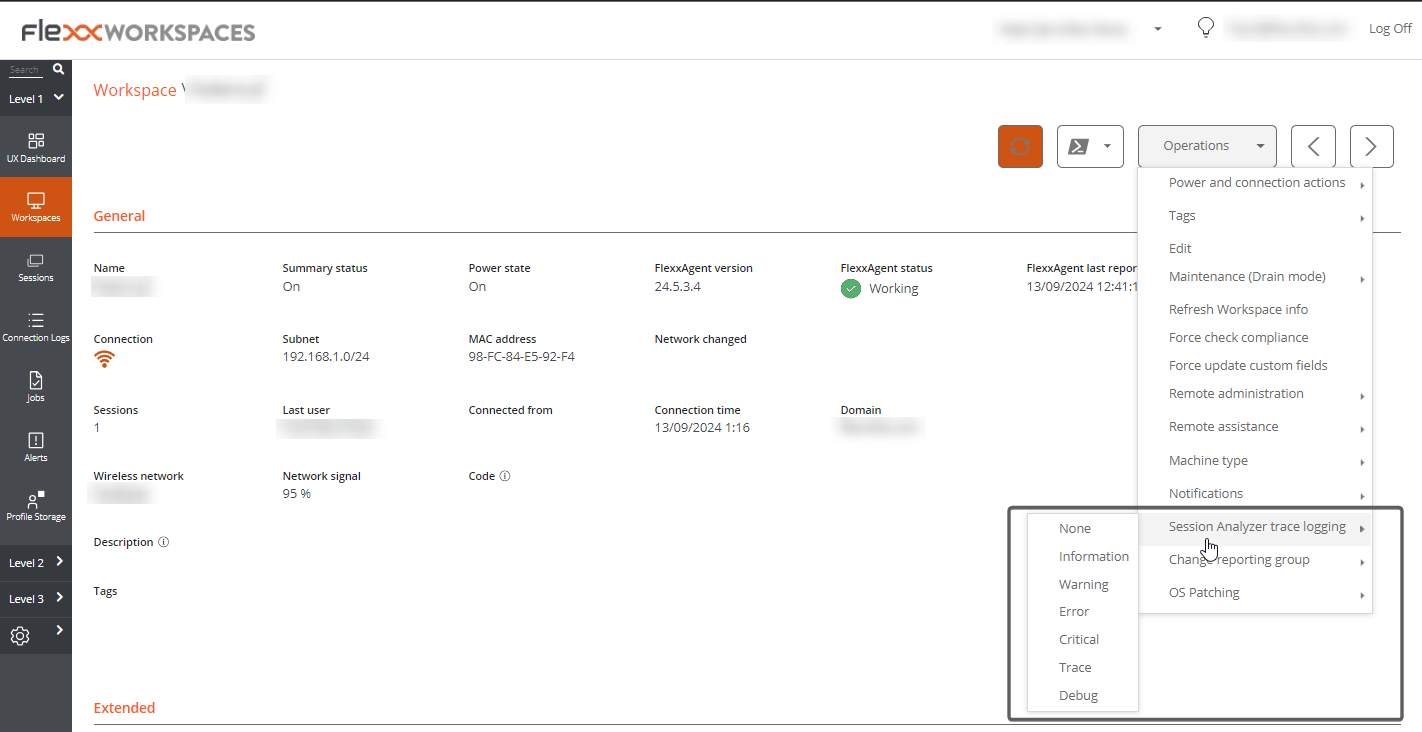
From Workspaces, the log level can be modified for one or several devices using the options available in the Operations button.
FlexxAgent service logs
Available in the Windows Event Viewer, under the Application branch.
FlexxAgent Health Status
The FlexxAgent Health Status process runs periodically (every hour) to evaluate whether FlexxAgent is functioning correctly. For this, it checks its heartbeat and analyzes various internal metrics that allow determining whether it is operating adequately or if a recovery process is necessary.
During this evaluation, external factors that might affect the agent's communication, such as:
- The device's connectivity at that time (it may or may not have WiFi or Ethernet connection).
- The interference of a firewall or proxy in the communication.
On the contrary, the following aspects are considered:
- That the service is running.
- That the service is not disabled; if it is, it is interpreted that an administrator has decided to take this action.
Verification of the FlexxAgent self-repair process
The self-repair of FlexxAgent can be confirmed in the following ways:
-
Through the
Last auto repaircolumn:- Access the
Workspaces->Level 1->Workspacesmodule. - In the table, check the
Last auto repaircolumn. If it's not visible, use the Column Selector to add it.
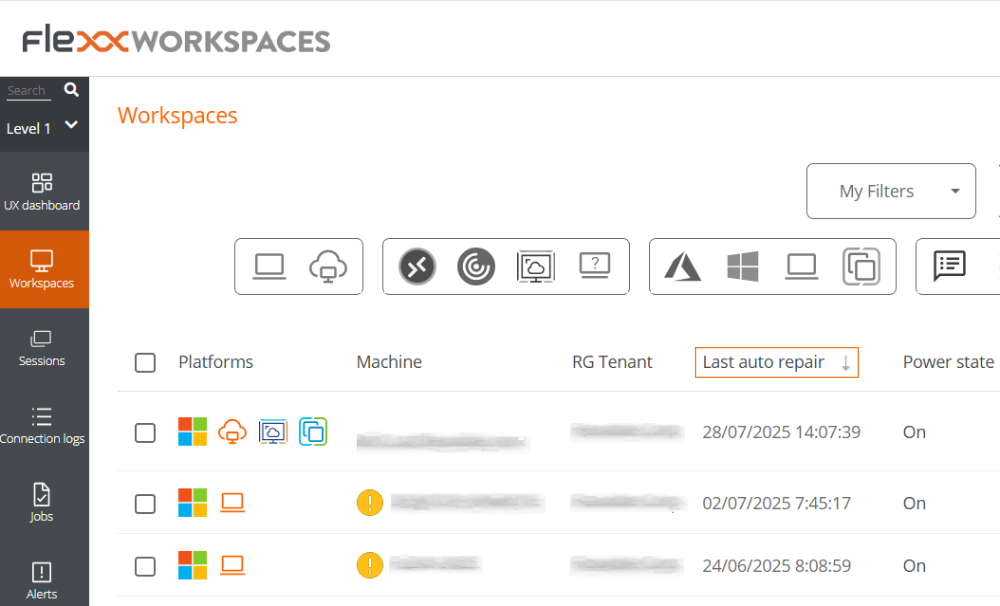
- Access the
-
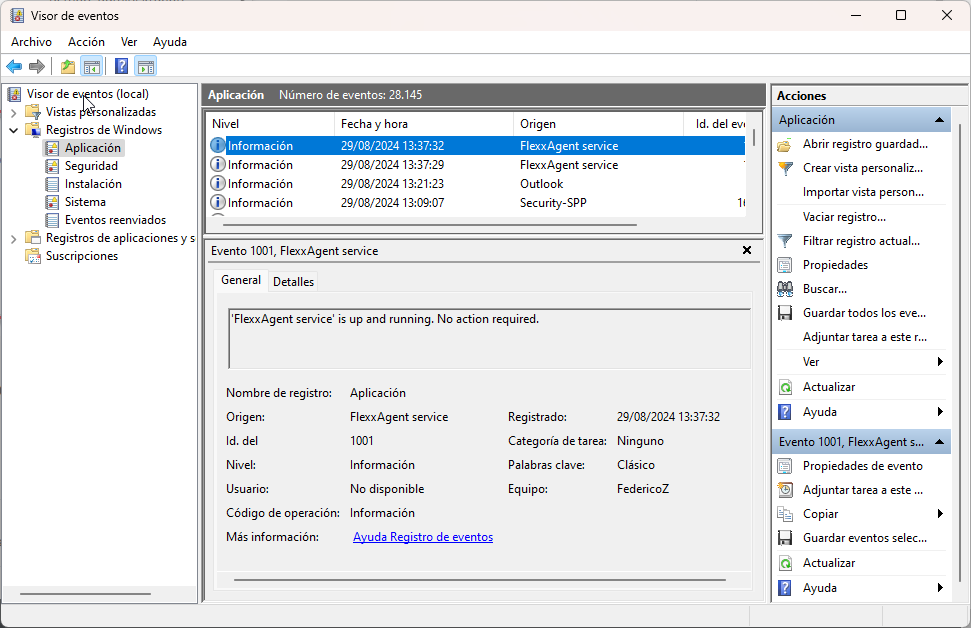
FlexxAgent leaves traces in the event log with the following entries:
- Source: FlexxAgent Service
- Log name: Application
- Event 1001 Checking FlexxAgent health /
<servicename>is up and running. No action required- Event 1002 Disabled service. No action required / Backup not found.
<serviceName>not recoverable- Event 1003 Service
<serviceName>restored from previous backup / Error<message>found when starting<serviceName>with restored backup- Event 1004 Service failed to start and will be repaired
- Event 1005 Service did not report for a long time and will be repaired
- Event 1006 Service was started
- Event 1007 Error found when restarting service after not reporting for a long time
Information obtained from the device
FlexxAgent collects data locally from the device and sends it to the service consoles.
General information
- Name. Device Name.
- Device Status. Device power state. It can be On, Off, or Not reporting.
- Summary status. If the device status is Off, it can indicate if it is Under maintenance or just Off. If the device status is Unreported, it can indicate if the reason is Unknown.
- FlexxAgent Version. Version number of FlexxAgent installed on the device.
- FlexxAgent Status. Running or Stopped.
- Last FlexxAgent report. Date and time of the last FlexxAgent report on the device. This date might not be recent if the FlexxAgent service is stopped or the device is off.
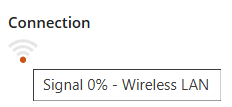
- Connection Type. Indicates if the device is connected via Wireless LAN, Mobile Network, Ethernet, or Unknown.
When the connection is made via a wireless LAN network, a message may appear indicating that the device has a 0% signal or that FlexxAgent is not sending reports. This occurs because the Windows location service is disabled on the device. Please check this link to learn how to enable it.
- Network. Network addressing of the device and public IP for internet access. These networks are created automatically when more than four devices are connected to the same network.
- Subnet. Device's network addressing.
- MAC Address. Unique identifier of the device's network card.
- Network Changed. Date and time of the last network change.
- Sessions. Number of user sessions established on the device.
- Last User. Last user logged into the device in domain\account format.
- Connected From. When the selected device is a VDI or similar, shows the device name from which the virtual device is accessed.
- Connection Time. Date and time when the session started.
- Domain. Domain to which the device belongs.
- Code. Lets identify the device with a personal code. This code must be manually filled in individually using the Edit option in the Operations menu of the workspace details.
- OU. Organizational unit of the domain where the device account resides.
- Description. Allows the user to identify the device with a personal description. This field must be assigned manually and individually using the Edit option in the Operations menu of the device details.
Extended Info
- RAM. Total amount of available RAM.
- Cores. Number of processor cores.
- IP Address. Device's IP address on the local network.
- OS. Type of operating system.
- Operating System. OS version.
- OS Build. Operating system build number.
- Uptime. Time the device has been running since the last boot or reboot. If fastboot is enabled, the device is only off when it is restarted.
- Idle time. Indicates the time elapsed since the last input event was received in the FlexxAgent user session. Shows 0 if the user is effectively using any input device connected to the device.
- Last Windows update. Date of the last updates applied on the device.
- Last boot duration. Duration of the boot of the last start.
- Pending reboot. Shows whether the device requires a reboot for updates.
- Type of Windows. Type of Windows operating system: Client or Server.
- System disk. Amount of free disk space relative to the total capacity.
- ISP Public IP. The ISP is obtained using the public IP. It might not be accurate if connected to a corporate network or using a VPN.
- Region. Obtained using the public IP. It might not be accurate if connected to a corporate network or using a VPN.
- Broker type. If detected, shows the session broker used.
- Hypervisor. If virtualization is detected, shows the hypervisor used.
- Delivery group. For VDIs, shows the delivery group to which the device belongs.
- Subscription / Broker. Microsoft Azure or Citrix service that manages user connections to the device.
- Registration status. Indicates the status of the virtual device registration.
- Maintenance mode. Indicates if the maintenance mode of the virtual device is On or Off.
- Virtual machine type. Indicates the type of virtual device.
- Session Analyzer. Indicates whether or not it's configured to launch session Analyzer in all user sessions.
- Session Analyzer Version. Version number of Session Analyzer.
- Report Group. Reporting group to which the device belongs.
- BIOS manufacturer. Name of the device's firmware manufacturer.
- BIOS version. Version of the device's firmware.
- SMBIOS version. Version of the System Management BIOS of the device.
- BIOS serial number. Unique number assigned to the device by its manufacturer. Available only if the manufacturer decided the device needed one.
- Google Chrome version. Build number of Google Chrome, if installed.
- Microsoft Edge version. Build number of Microsoft Edge, if installed.
Information in tabs
FlexxAgent groups information about the following aspects of the device:
Sessions
Displays a table with the log of user sessions established on the device and timely information about the session type, connection status, or start date.
Performance
Displays graphs of the device's main performance counters, based on data collected over the last two hours. The following are included:
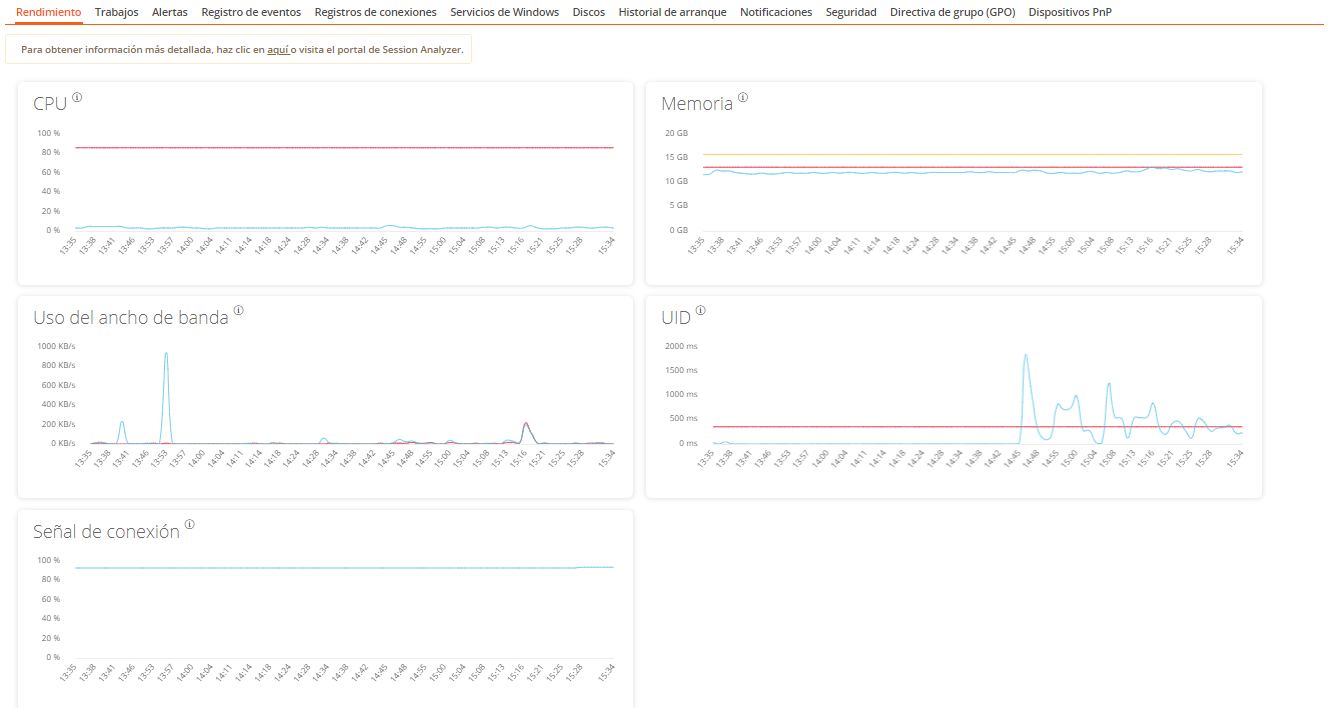
- CPU. Percentage of processor usage
- Memory. Amount of memory used and available
- Bandwidth usage. Amount of incoming and outgoing traffic
- UID. User input delay. Refers to the time lapse between the moment a user performs an action, such as clicking a mouse button or pressing a key, and the moment the corresponding response is displayed on the screen or executed.
- Connection signal. Percentage of signal reception when the device connects using a wireless method.
At the top, a link grants access to the Analyzer module.
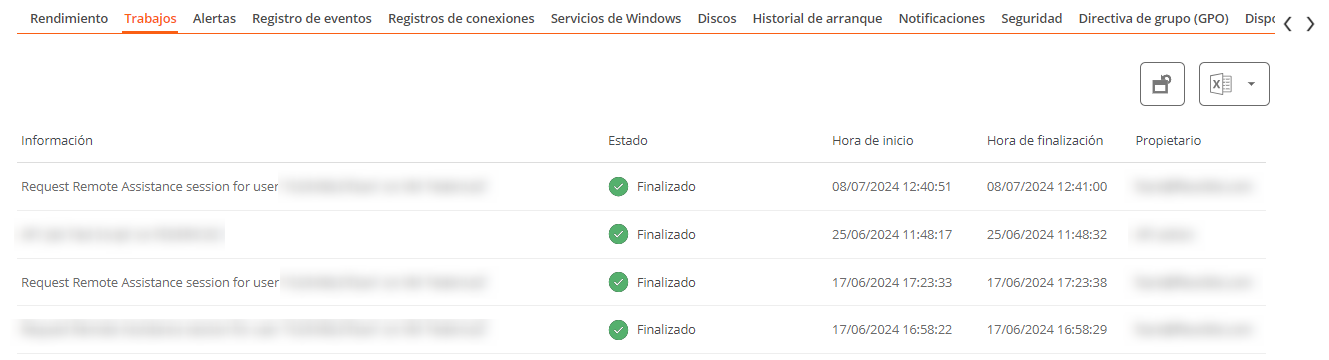
Job
All actions performed from the Workspaces module on one or more devices are audited in the Jobs queue. This tab allows you to check the work done for the active device.
Alert
Presents a table with the list of all active alerts on the device. When an alert is logged, a notice is displayed at the top of the page.

Event Logs
Information about the events present on the device. By default, errors are filtered and only those with severity level Error or Critical are shown. FlexxAgent obtains this information in 10-minute intervals.
The available settings allow you to modify the sampling time or include events by their ID.
Connection Log
Presents a list of the connections established with the device, including each instance where a user logs in or reconnects a previously disconnected session.
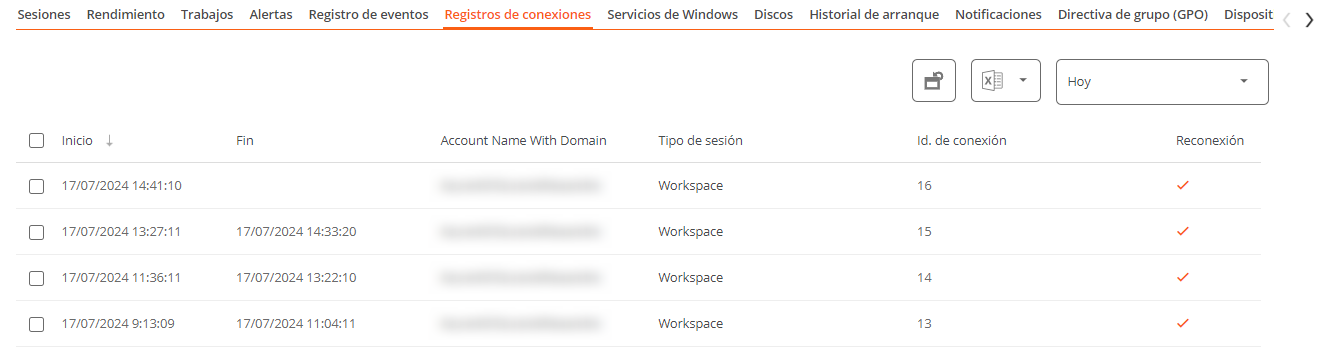
The session end date is recorded only for sessions that have been disconnected or closed. While the session remains active, this field will remain empty.
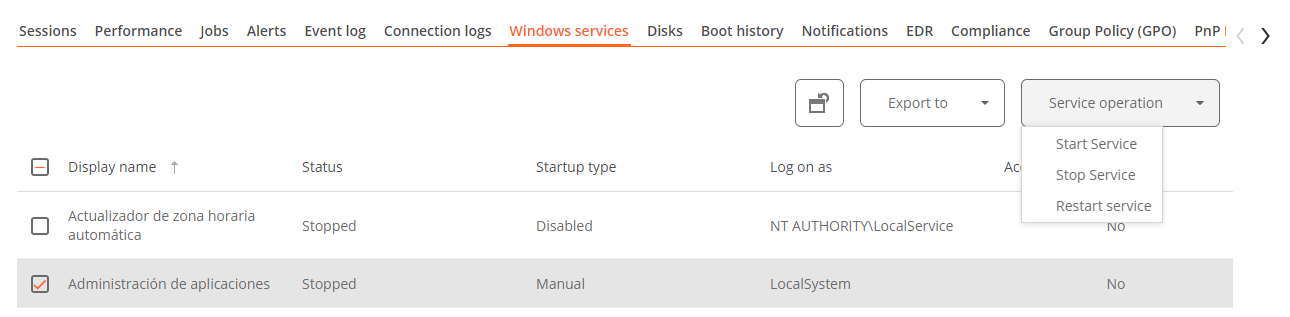
Windows services
This option displays the status of services and performs start, restart, or stop operations on Windows services.
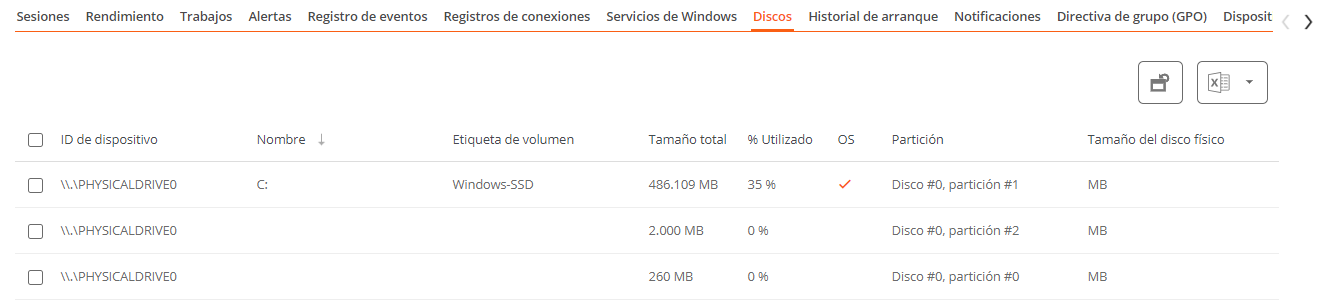
Disks
Displays a list of all partitions present on the disks identified in the system, as well as statistics of their capacity and occupancy levels.
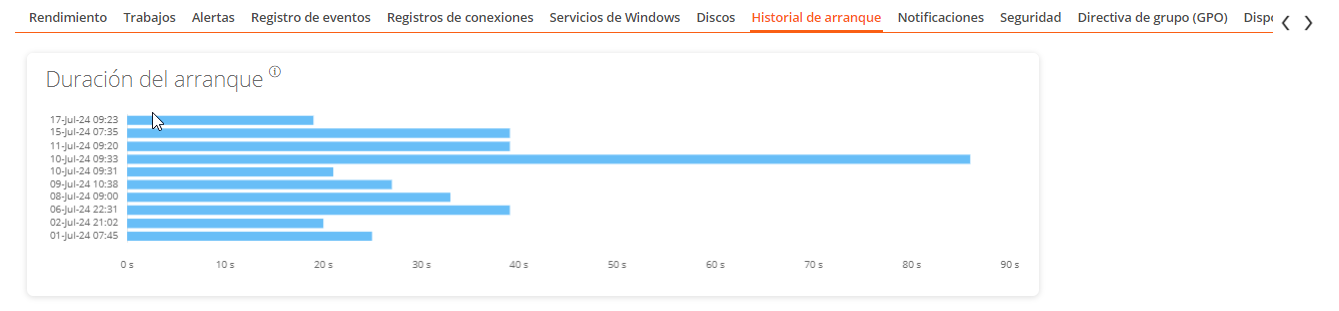
Boot history
Displays a graph showing the duration of the last ten boots of the device.
Notifications
Allows you to see if the device has any active notification. When there is one, a message is displayed at the top of the page.

Security
From this section, you can view information about the installed antivirus, as well as graphs on RAM and CPU usage.
- Antivirus. Name of the antivirus solution installed or integrated into the system. If more than one is detected, Multiple is indicated.
- Antivirus version. Installed version number.
- Antivirus status. Operational state of the solution.
Antivirus detection is automatic only on the Windows Client operating system (Windows 7 or later). On Windows Server, only Bitdefender and Windows Defender will be detected, and these will be the only ones to show RAM and CPU usage.
If FlexxAgent detects CrowdStrike as the Endpoint Detection and Response (EDR) solution, the same information fields will be displayed:
- Endpoint Detection and Response (EDR). Name of the endpoint security solution; in this case, CrowdStrike.
- CrowdStrike version. Installed version number.
- CrowdStrike status. Operational status of the solution.
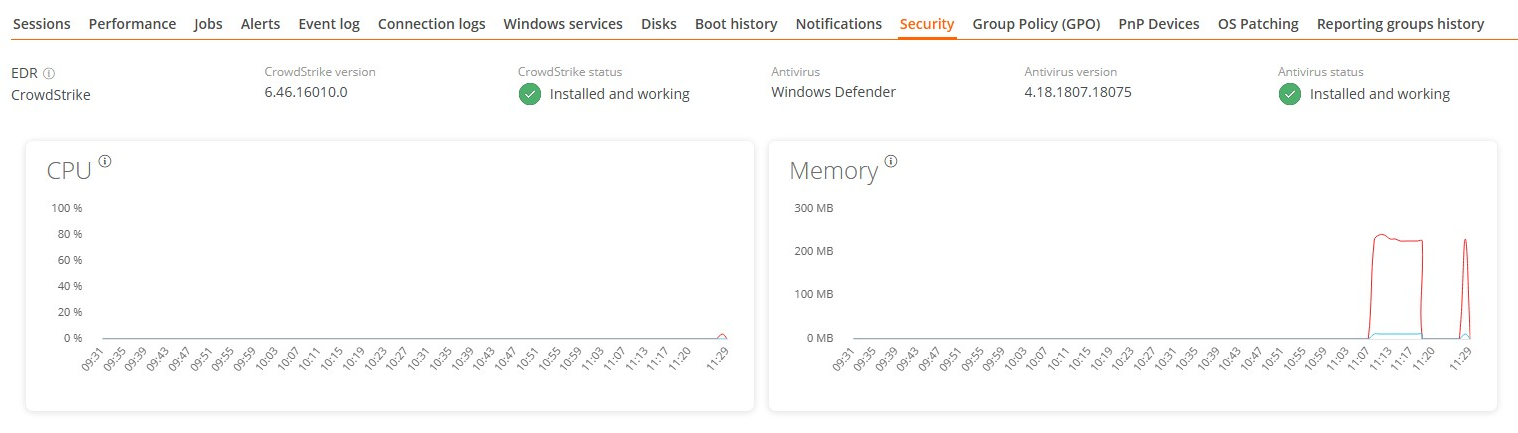
FlexxAgent synchronizes CrowdStrike alerts every minute.
If CrowdStrike integration has additionally been performed from Portal, a table with information on the detections will be displayed, including the following fields:
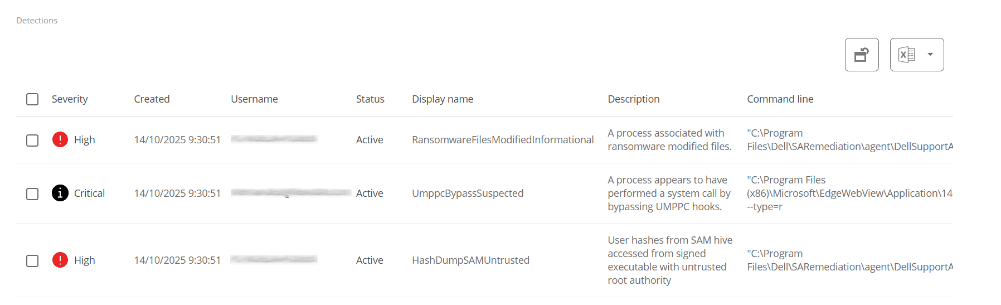
- Severity. Criticality level assigned to the detection according to the potential impact or risk of the threat.
- Created. Date and time the detection was generated in the system.
- Username. User associated with the activity or process that triggered the detection.
- Status. Current status of the detection.
- Display Name. Descriptive name assigned to the detection, summarizing the type of threat or behavior identified.
- Description. Expanded information about the detection.
- Command line. Command or instruction executed on the appliance related to or that generated the detection.
Compliance
Allows viewing the status of the compliance policy configured for the active device. To update this field on demand, click on Operations -> Enforce compliance.

Group Policy (GPO)
Displays information about the group policies applied on the active device. Allows you to see the names of the policies as well as the verification time.
PnP Devices
Displays Plug and Play (PnP) devices that are in an error state, which may be due to hardware failures or incorrect driver or device configuration.
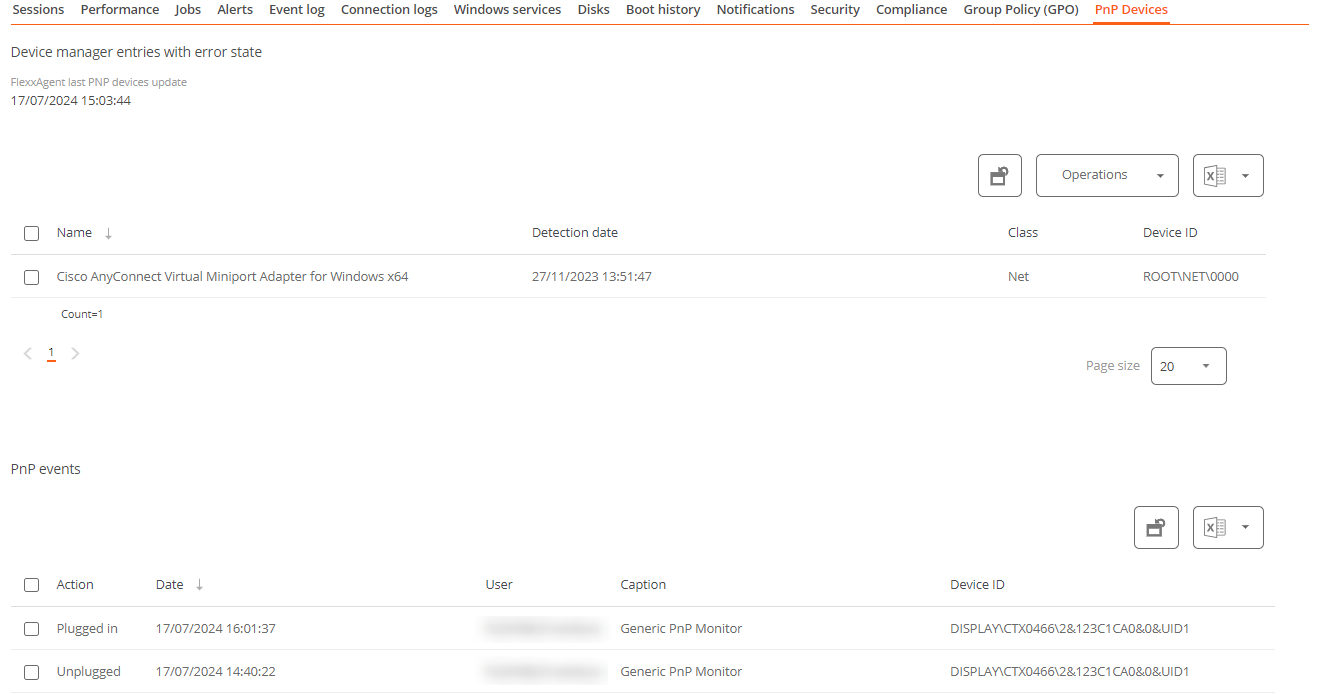
At the bottom of this view, a table shows all events related to PnP devices, creating an entry each time a peripheral is connected or disconnected.
System Summary
Displays system information for Windows devices. Includes:
| Field | Detail |
|---|---|
| OSVersion | Operating system version number |
| OtherOSDescription | Additional description of the current operating system version (optional) |
| OSManufacturer | Nombre del fabricante del sistema operativo. In the case of Windows-based systems, this value is "Microsoft Corporation" |
| SystemModel | Product name given by a manufacturer to a piece of equipment |
| SystemType | System running on the Windows-based equipment |
| SystemSKU | Stock keeping unit (SKU) product information (optional) |
| Processor | Name, number of cores, and number of logical processors of the processor |
| BIOSReleaseDate | BIOS Release Date |
| EmbeddedControllerVersion | Primary and secondary firmware versions of the embedded controller, separated by "." |
| BaseBoardManufacturer | Name of the organization responsible for manufacturing the physical device |
| BaseBoardProduct | Manufacturer-defined part number for the motherboard |
| BaseBoardVersion | Version of the physical device |
| PlatformRole | Type of chassis where Unspecified = 0, Desktop = 1, Mobile = 2, Workstation = 3, EnterpriseServer = 4, SOHOServer = 5, AppliancePC = 6, PerformanceServer = 7, MaximumValue = 8 |
| WindowsDirectory | Operating system's Windows directory |
| SystemDirectory | Operating system's system directory |
| BootDevice | Name of the disk drive from which the Windows operating system starts |
| Locale | Name Identifier of language used by the operating system |
| TimeZone | Name of the operating system time zone |
| PageFileSpace | Actual amount of disk space allocated for use as a page file, in megabytes |
| PageFile | Name of the page file |
| BIOSMode | Device boot mode (BIOS or UEFI) |
| SecureBootState | Secure boot mode status (Off, On) |
Reporting groups history
Allows you to see which reporting groups the device belongs to, the date of incorporation, and if it has been assigned to the group manually or automatically.