

General
Lets you define generic information about the organization, which can be updated at any time through the Edit button. The data that can be modified is:- Name. Name of the organization.
- Email. Associated email address.
- Language. Configured language.
- Country. Country the organization belongs to.
- Sector. Sector it belongs to.
- Description. Organization description.
- Members. Number of members the organization has registered on the platform.
- Products. Number of Flexxible products the organization has contracted.
- Creation date. Date the organization was registered on the platform.
- Partner. For customer-type organizations, lets you define the partner or modify it.
- Type. Organization type assigned to it.
Branding
Facilitates storing information linked to the organization’s brand identity. Clicking the Edit brand settings button opens a form designed to upload files with the organization’s logo and cover image, as well as a palette for defining corporate colors in hexadecimal format.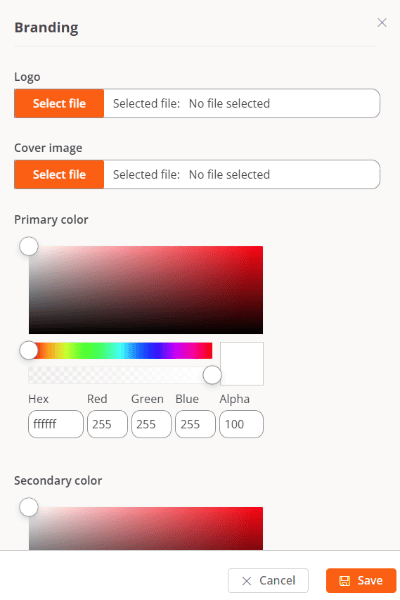
Microservices
Through its configuration and classification options, it lets you change the name of the folder that contains the end-user microservices and manage the predefined categories. It also displays the date and the name of the user who last updated the information.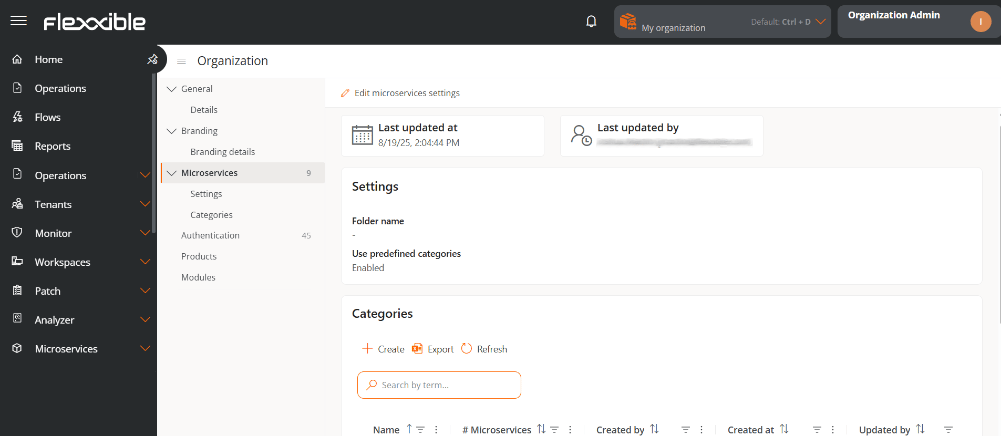
Settings
This section shows the name assigned to the end-user microservices folder and whether the option to use predefined categories is enabled.Folder name
When microservices are enabled for execution by the end user, they are automatically added to a folder on the device called Flexxible; however, this name can be modified.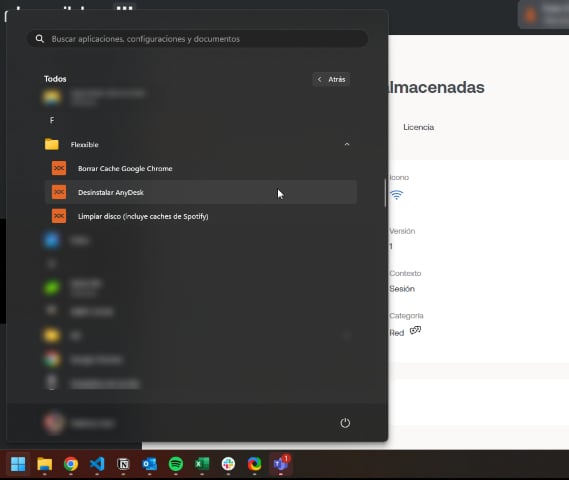
Change the microservices folder name
- Go to Settings → Organization.
- In the left side menu, select Microservices.
-
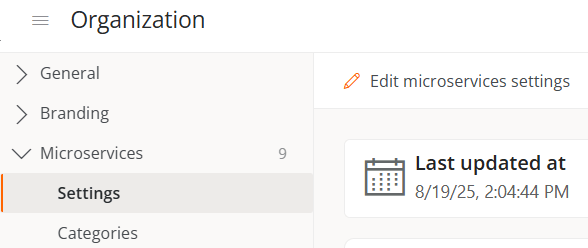
Click Edit microservices settings.
-
Enter the new name in the Folder name field. The structure must be between 3 and 50 characters and can only contain letters, numbers, hyphens, and underscores.
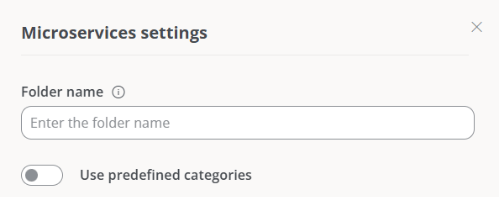
- Click Save.
If the device runs Windows 11 as its operating system and only one microservice is enabled for an end user, the Flexxible folder will not be displayed; instead, only the microservice icon will be shown in the start menu.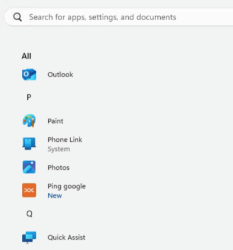
Predefined categories
This functionality allows users with the Organization administrator role to define and manage classification categories for microservices. Configuration can only be performed from the main organization and is automatically inherited by sub-organizations, ensuring consistency and preventing the creation of random categories.Enable predefined categories
- Go to Settings → Organization.
- In the left side menu, select Microservices.
- Click Edit microservices settings.
-
Enable the Use predefined categories toggle.
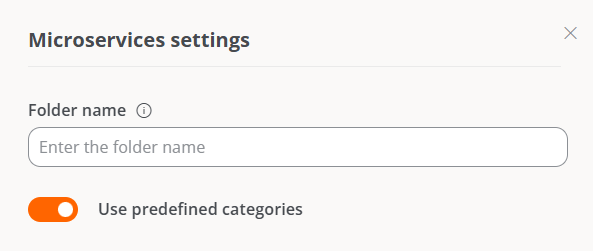
- Click Save.
- The Categories section is created automatically, containing a table with the list of the organization’s microservice categories.
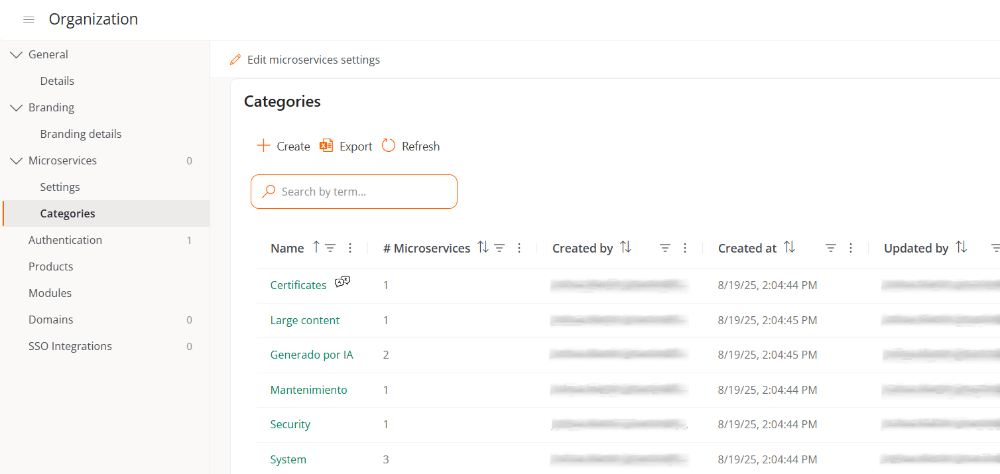
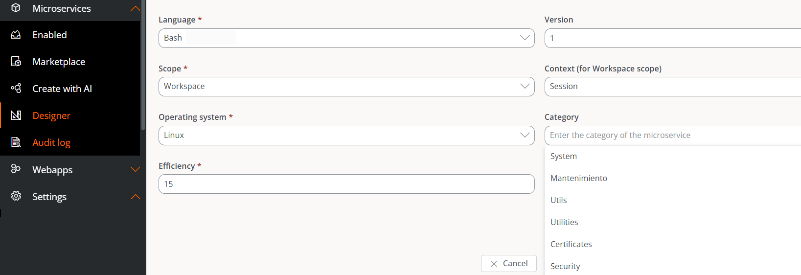
- The categories also appear in the Designer section, so users can only choose from the categories available in the list.
Disable predefined categories
- Go to Settings → Organization.
- Select the Microservices tab.
- Click Edit microservices settings.
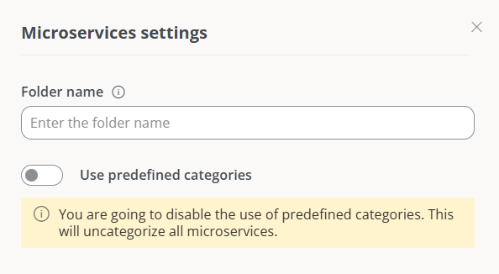
- Disable the Use predefined categories toggle.
Categories
This tab is enabled only when the predefined categories option is activated. It contains a table with the list of categories and lets you create new ones or delete existing ones.Create a predefined category
- Go to Settings → Organization.
- In the menu, go to Microservices → Categories.
-
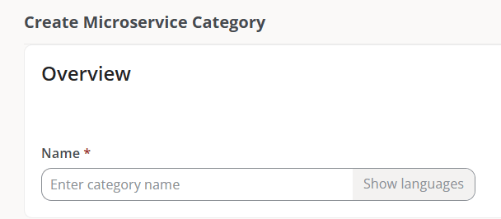
Click New and enter the name of the new category.
-
Click
Save.
Delete a predefined category
- Go to Settings → Organization.
- In the menu, go to Microservices → Categories.
- Select a category from the table and click Delete.
Reports
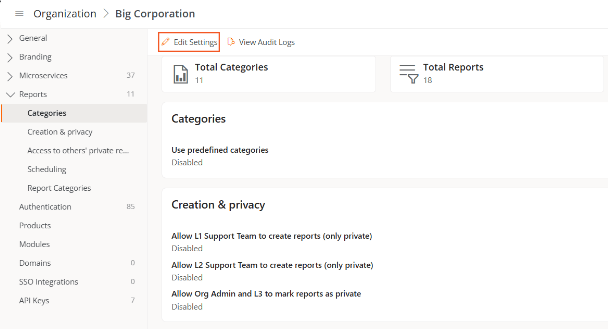
From this tab you can manage the categories associated with the reports generated in the Create with AI - Reports section, as well as configure the privacy and permissions related to them.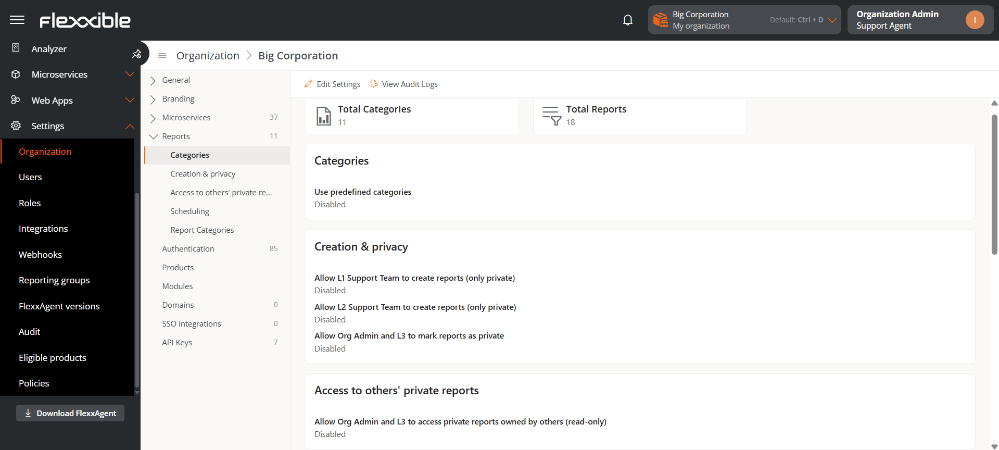
- Categories
- Creation and privacy
- Access to other users’ private reports
- Scheduling
- Report categories
Categories
Indicates whether predefined report categories are enabled for the organization.Creation and privacy
Shows which roles can create private reports and which roles can mark their reports as private.- L1 support team
- L2 support team
- Organization administrator and L3 engineering team
Access to other users’ private reports
Indicates whether users with the Organization administrator or L3 engineering team role can access private reports owned by other users in read-only mode.Scheduling
Indicates whether users with the L1 support team and L2 support team roles can configure automatic schedules for their own reports.Report categories
Displays a table with the report categories defined by the organization. Each record includes the following fields:- Name. Category identifier.
- Description. Descriptive information about the category.
- Number of queries. Total number of queries made on the reports associated with the category.
- Created on. Creation date and time.
- Created by. User who created the category.
- Updated on. Date and time of the last modification.
Edit settings
To configure report categories and control the behavior related to privacy, access, and scheduling:- Go to Settings → Organization.
- Select the Reports tab.
-
Click Edit settings.
-
Fill in the following fields:
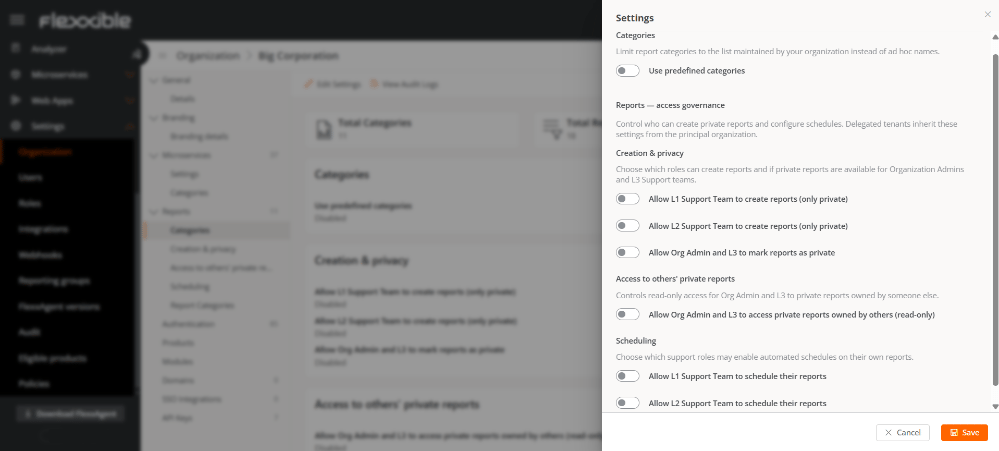
- Categories. Lets you limit the available categories to those defined by the organization, preventing the use of custom (ad hoc) names.
- Reports - Access governance. Lets you control who can create private reports and configure schedules. Sub-organizations inherit this configuration from the main organization.
-
Creation and privacy. Lets you define which roles can create reports and whether private reports are available for the Organization administrator and L3 engineering team.
- Allow L1 support team to create reports (private only).
- Allow L2 support team to create reports (private only).
- Allow the Organization administrator and L3 engineering team roles to mark reports as private.
-
Access to other users’ private reports. Lets you enable read-only access for the Organization administrator and L3 engineering team to private reports owned by other users.
- Allow the Organization administrator and L3 engineering team to access private reports owned by other users (read only).
-
Scheduling. Lets you define which roles can configure automatic schedules for their own reports.
- Allow the L1 support team to schedule their reports.
- Allow the L2 support team to schedule their reports.
Considerations about permissions
- Private reports can only be viewed and managed by the user who created them.
- The information visible within a report will always depend on the user’s role configuration and their visibility over organizations and reporting groups.
- A user will never be able to view information from organizations or reporting groups over which they do not have permissions.
- During scheduled report executions, the current permissions and visibility of the user who owns the report will always be applied.
Permissions by role
L1 support team
L2 support team
Organization administrator or L3 engineering team
Create category
To create a new report category:- Go to Settings → Organization.
-
Select the Reports → Report categories tab.
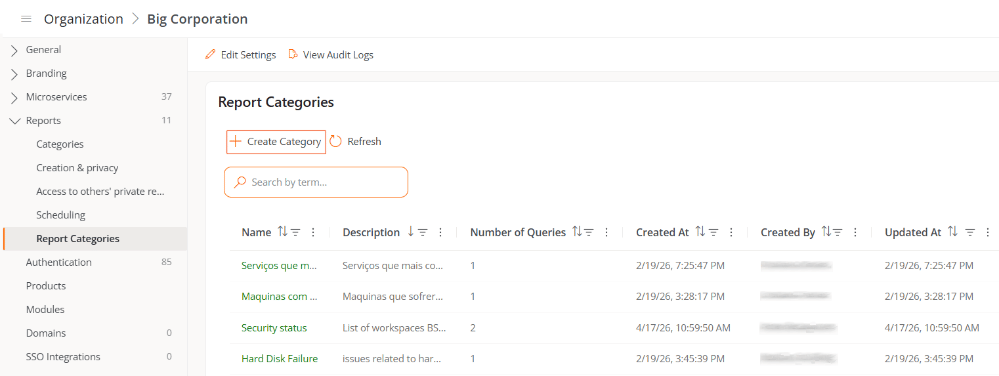
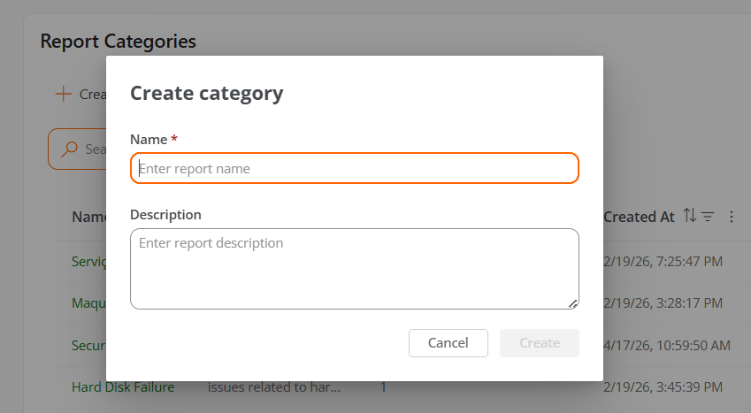
- Click Create category.
-
Fill in the Name and Description fields.
Authentication
From this tab, an Organization administrator user can enable or disable the option to sign in using email and password for users in the organization. If sub-organizations exist, the functionality can only be enabled or disabled from the main organization. The Enable email/password authentication or Disable email/password authentication button, depending on the case, lets you enable or disable the ability to allow email and password sign-in for members of an organization or sub-organization.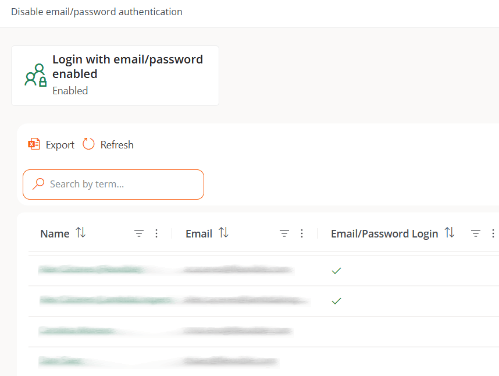
User table
Displays the list of the organization’s members. At a glance, you can see which members have email and password sign-in enabled.Authentication details for a user
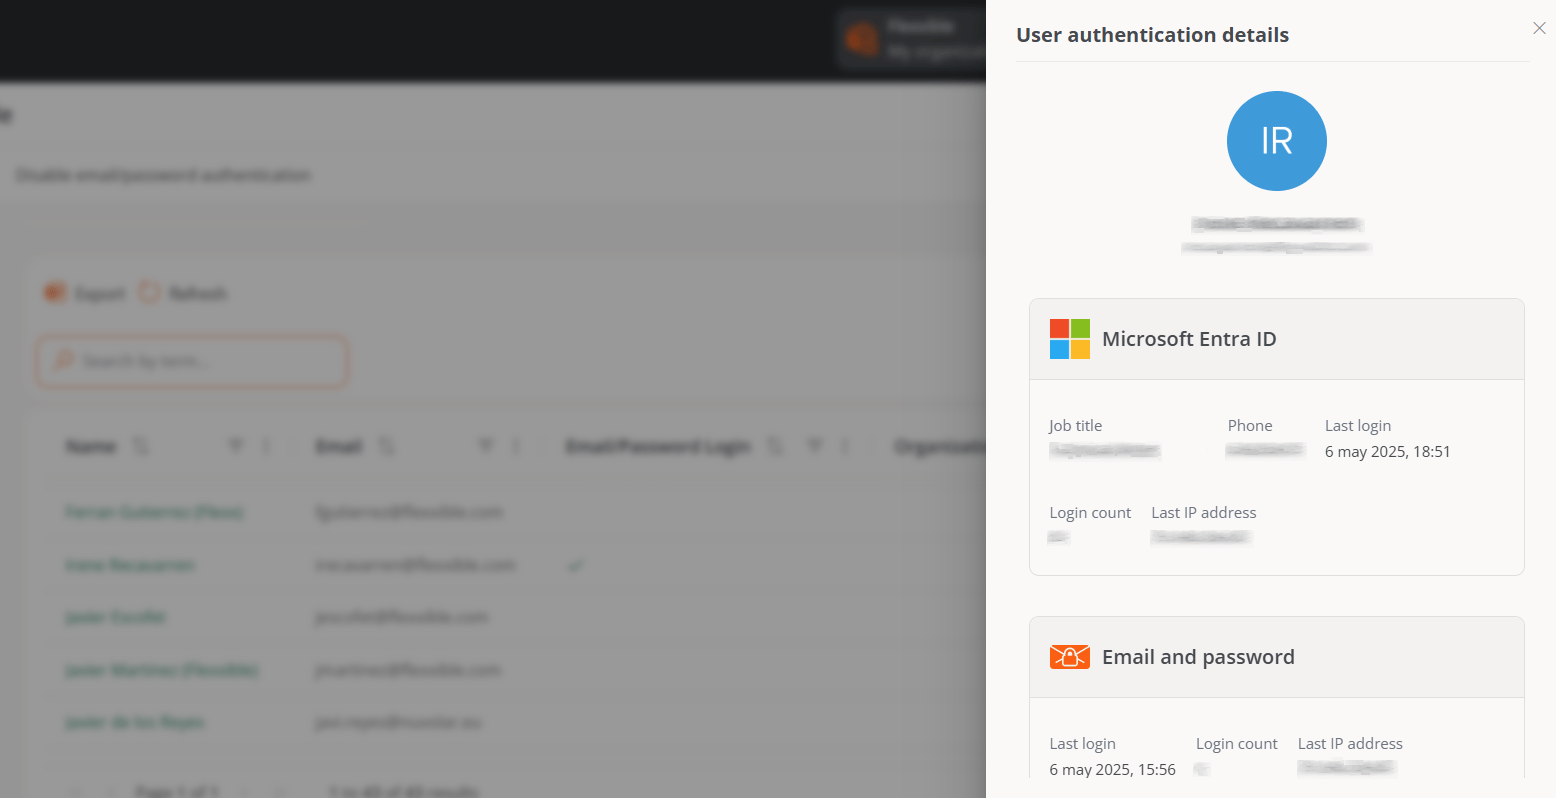
If you click on a user’s name in the table, you can access cards with specific information about the enabled authentication method:- Microsoft Entra ID. Job title, Phone, Last sign-in, Sign-in count, Last IP address.
- Google. Last sign-in, Sign-in count, and Last IP address.
- Email and password authentication. Last sign-in, Sign-in count, and Last IP address. In addition, from here the administrator can manage the Authentication security settings for that specific user, including Two-factor authentication and Password.
Products
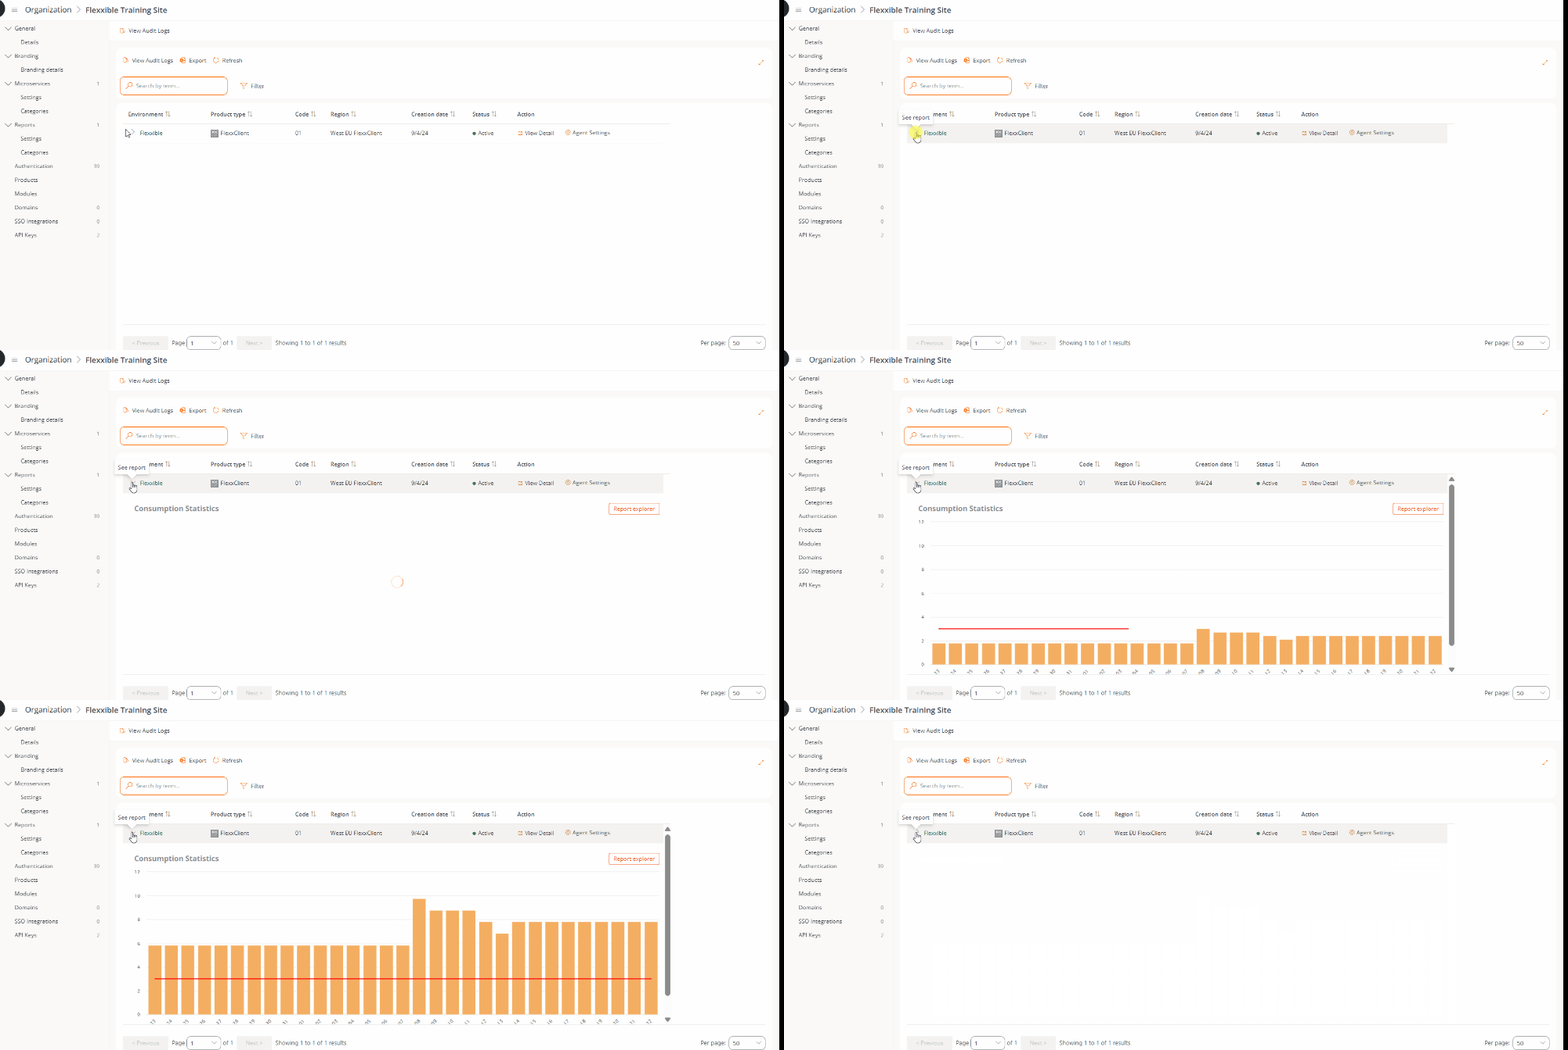
This tab shows the Flexxible environments and products associated with the organization.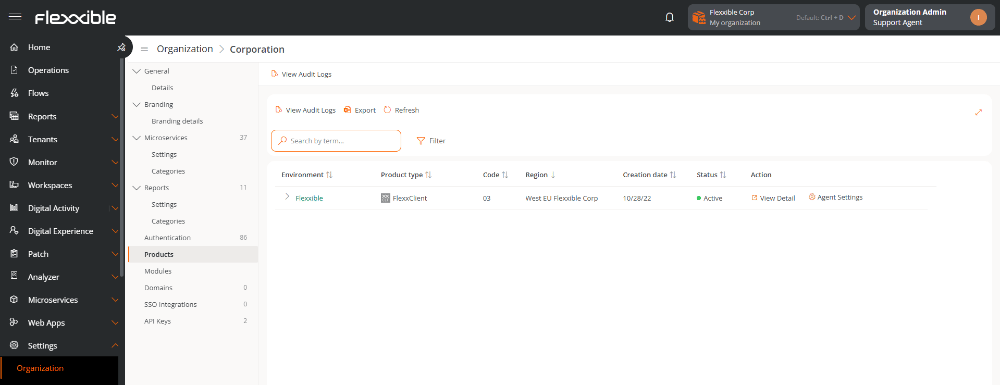
- Environment
- Product type
- Code
- Region
- Creation date
- Status
- Action
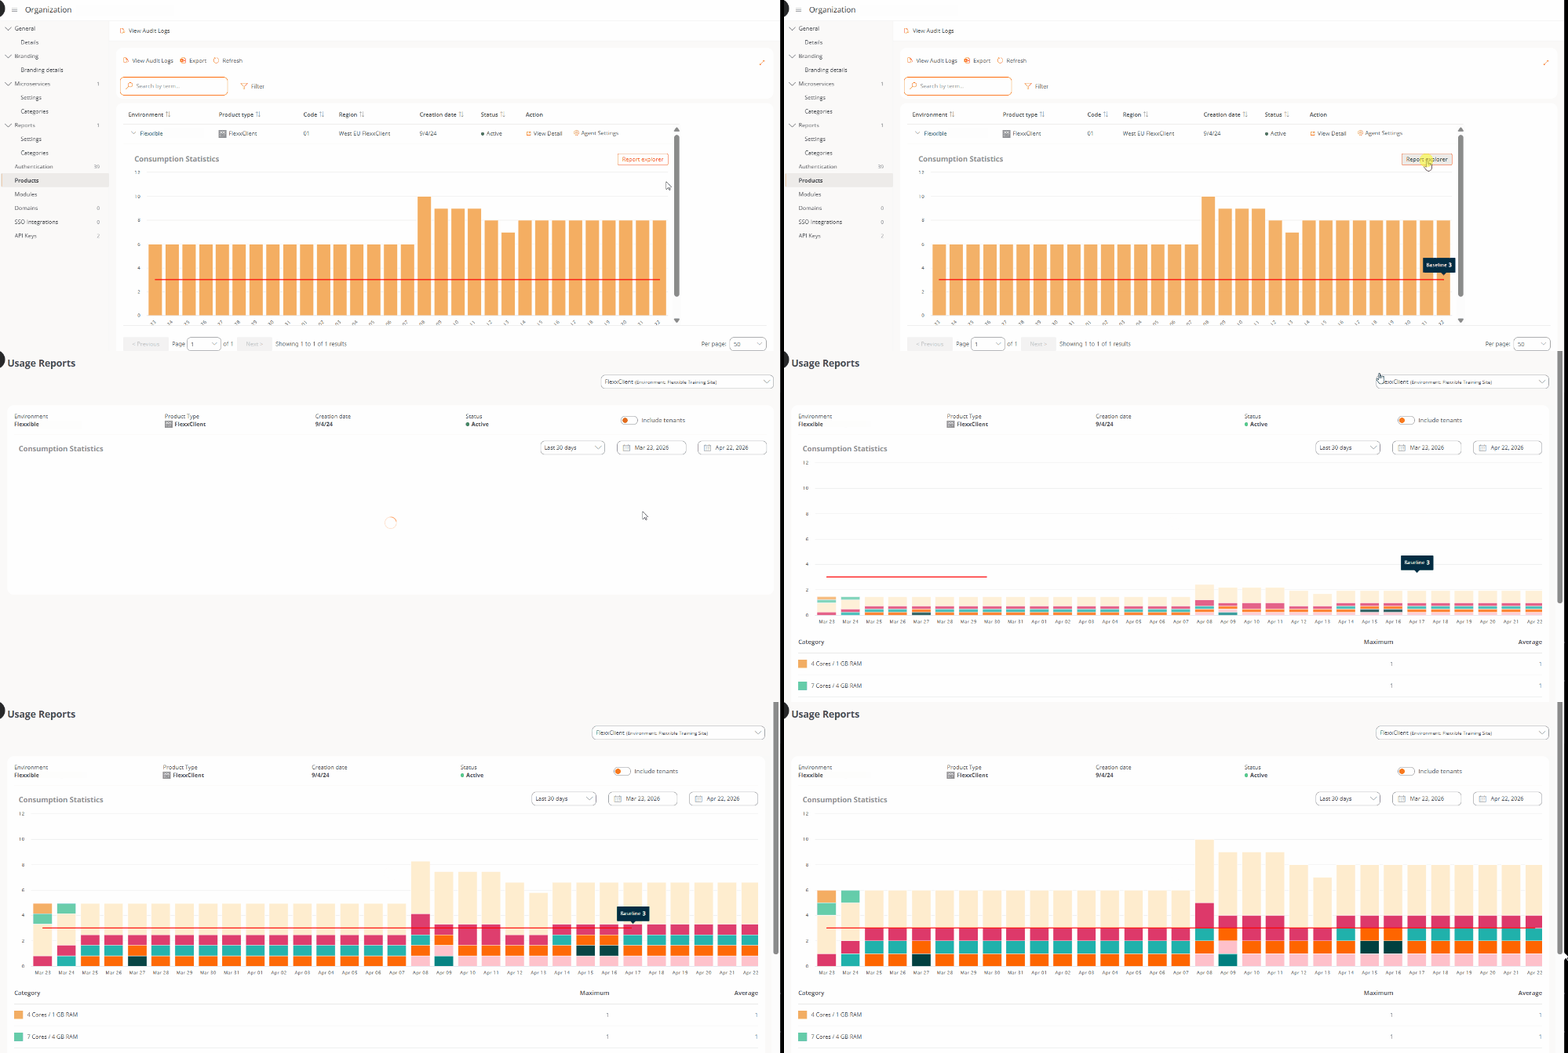
View details
The View details button lets you consult and modify the product information:- Environment. Environment where the product runs.
- ServiceNow environment. Identifier of the associated ServiceNow instance.
- License key. Unique identifier of the product license.
- Creation date. Date and time the product was created in the organization.
- Status. Lets you enable or disable the product.
- Digital Activity. Lets you enable or disable this functionality.
FlexxAgent settings
The Agent settings button lets you adjust the agent’s behavior.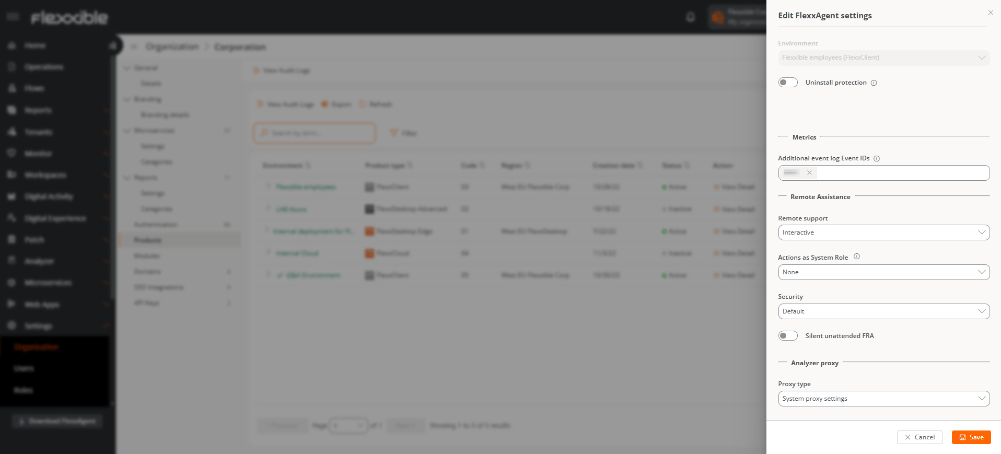
-
Uninstall protection
Lets you prevent the user from uninstalling the agent.
Requires FlexxAgent version 25.4.2 or later.
- Web Apps Defines whether FlexxAgent collects information about web applications.
-
Metrics
-
Additional event log event IDs
Lets you specify additional event log IDs that FlexxAgent should collect.
By default, only Critical and Error events are collected from the Application, Security, and System logs. You can add events of the following types:
- Critical
- Error
- Warning
- Information
- Enter the numeric value.
- Press Tab or Enter to confirm.
Get-WmiObject -Query "Select * from Win32_NTLogEvent WHERE EventCode = XX"
-
Additional event log event IDs
Lets you specify additional event log IDs that FlexxAgent should collect.
By default, only Critical and Error events are collected from the Application, Security, and System logs. You can add events of the following types:
-
Flexxible Remote Assistance
-
1. Remote assistance
Lets you define the type of remote assistance that will be used at the organization level.
Available options:
- None: the device will not be able to receive remote assistance.
- Interactive (attended)
- Interactive and unattended
- Dynamic
-
2. Actions as system role
Defines which user role can run applications (CMD, PowerShell, Task Manager, and Regedit) as the system user in the assisted user’s session during a remote session.
This feature can pose a risk if used incorrectly.
-
3. Security
Lets you choose between:
- Default
- Simplified
3.1. Simplified security This functionality reduces the time required to start a remote assistance session without having any practical effect on security. From a security standpoint, the usual conditions are maintained.After modifying the Security setting, a few minutes may pass before it is applied on all devices. In some cases, restarting the computer may be required.This feature is disabled by default.
Differences between default and simplified security1. Service execution mode
2. Name and paths of files, services, and processes
Simplified security requirements- FlexxAgent version 26.4.1.0 or later on the remote device.
- Setting enabled on the corresponding reporting group.
- Virtual machines with Windows Client (Windows 7, 8, 10, 11)
- Devices with FlexxAgent Cross-Platform (this functionality is coming soon).
- Reduction of the remote assistance file generation time by 50% to 85% depending on the type of assistance.
-
The
Ctrl + Alt + Delkey combination is supported in both interactive (attended) and unattended assistance.
-
To verify that the agent is configured with Simplified security:
- Review the Windows services on the device.
- Check whether the AnyDesk Client Service exists. Except during an active remote assistance session, this service must be stopped and disabled.
-
To find out whether a remote assistance session is running in Simplified security mode:
- Each remote assistance session generates the
EventLogId 666event on the target device, visible from the device itself or from theEvent logtab in Workspaces. This event includes a line that indicates the execution mode of the remote assistance for that session.
- Each remote assistance session generates the
-
1. Remote assistance
Lets you define the type of remote assistance that will be used at the organization level.
Available options:
-
4. Silent unattended FRA
- Lets you perform unattended remote assistance sessions without showing on screen that assistance is being performed.
- Useful on devices such as kiosks or computers with sessions visible to the public.
This feature is disabled by default.
-
Analyzer proxy
FlexxAgent consists of a Windows service called FlexxAgent Service, which manages two processes: FlexxAgent, which runs at system level, and FlexxAgent Analyzer, which is started for each user session.
The proxy configuration for FlexxAgent Analyzer is not always the same as that of FlexxAgent, so, depending on how the proxy works in each environment, it will be necessary to set its options appropriately.
-
System proxy configuration
- FlexxAgent Analyzer automatically detects the proxy configuration and uses it.
- Flexxible recommends this configuration for system proxies.
-
Configuration detected by FlexxAgent
- In this case, FlexxAgent uses the credentials found in the registry, if defined during installation.
- If not configured, FlexxAgent automatically detects the proxy configuration.
- FlexxAgent Analyzer uses the detected configuration for the Uniform Resource Identifier (URI), the user, and the password.
-
System proxy configuration
Some of the FlexxAgent configuration options are not visible to users with the Organization administrator role.
Modules
This tab shows a list of the Flexxible product modules available to the organization, as well as those created by users themselves. The table contains the module name, the corresponding URL, and its visibility level. From View details, you can assign a label and a URL to the selected module and define whether it is visible as Featured or Secondary. When it is featured, it appears among the main modules on the Home page; when it is secondary, it is displayed as a list under the View more button.Create a module
The New button lets you create custom modules to get the most out of the platform. For example, in the images below, you can see how a module has been created for the Flexxible documentation website.Domains
The platform lets you configure sign-in through SAML authentication, a single sign-on (SSO) technology that lets organizations connect their identity managers with the Flexxible platform. To configure sign-in with this method, adjustments must be made related to recognizing the organization’s domain and integrating with the identity manager used. From this tab, an Organization administrator can register and verify the domains that will be used. They can also access the table with the list of domains and consult its details view. The table shows the following information:- Domain name. Web address registered by the organization.
- Status. Verified or Not verified.
- Created on. Domain creation date and time.
- Created by. User who registered the domain.
Create a domain
To configure a domain, it must first be registered and then verified.- Go to Organization → Domains.
- Click Create domain.
- Enter the organization’s domain (corresponding to the email address of the users who will sign in with SAML).
- Click New.
Verify the domain
- In the Domains table, select the registered domain.
- A window will be displayed with instructions for adding a TXT record in DNS, required to verify ownership.
- Click Verify now to complete the process.
Delete a domain
- Go to Organization → Domains.
- Select the domain you want to delete from the table.
- In the details window, click Delete.
SSO integrations
SSO integrations lets users with email addresses from specific domains authenticate through the organization’s identity provider.Create an SSO connection
- Go to Organization → SSO integrations.
- Click Create connection and follow the instructions in the wizard, which will guide the Organization administrator through configuration and testing depending on the identity manager used.
- Okta
- Entra ID
- Custom SAML
If any question arises during the configuration process, please consult your Flexxible contact.
Edit an SSO connection
The platform lets you edit an existing SSO connection, either to update the configuration or to renew the certificate in case of expiration.- Go to Organization → SSO integrations.
- Select a record in the table.
- Click Edit connection.
Delete an SSO connection
- Go to Organization → SSO integrations.
- Select the corresponding record in the table.
SCIM provisioning
The System for Cross-domain Identity Management (SCIM) is a user provisioning and management standard that complements SAML authentication. It is optional, and its function is to automate the creation, update, and deletion of user accounts on the platform, keeping information in sync between the organization’s identity manager (Okta, Entra ID, etc.) and the Flexxible platform. When SCIM is enabled, the identity manager can send the platform basic user information (name, email, group), which facilitates onboarding and offboarding management. In this way, the user’s lifecycle on the platform is centrally controlled from the identity manager.The SCIM provisioning tab will be visible after creating user groups in the identity manager.
Enable SCIM
To use SCIM, SAML authentication must have been previously configured:- Go to Organization → SSO integrations.
- In the table, select the corresponding SSO connection.
- Select the Enable SCIM user provisioning option.
- SCIM endpoint
- Authentication token
In environments with sub-organizations, the SCIM integration must be defined in the “parent” tenant.
Configure SCIM in the identity manager
In the organization’s identity manager, you must enter the SCIM endpoint and the authentication token provided. Example with Entra ID:- Go to Provisioning.
- Enter the SCIM endpoint and the authentication token.
- Select the authentication method: Bearer token or Bearer Authentication.
- Click Test connection to validate the sync.
- Enable provisioning.
- If Okta is used as the identity provider:
- SCIM functionality must be configured using the Custom SAML option, since Okta does not support SCIM if the connection is with OIDC.
- When configuring the Custom SAML connection, the Application username format must be set to Email, otherwise users will not be able to authenticate.
Create user groups in the identity manager
To integrate users via SCIM, groups must be created in the identity manager.Considerations
- Create groups specifically dedicated to the platform with clear and exclusive names (e.g.,
MyOrg-Portal-L2). - When user groups are created or deleted in the identity manager, they will also be automatically created or deleted on the platform.
- Do not create nested groups.
- A user must belong to only one group; otherwise, unexpected behaviors may occur: on the platform, a user cannot have more than one role.
- There cannot be users without an assigned group.
- Users belonging to a group that does not have a role linked to it will not be visible in the Users list.
After creating user groups in the identity manager, the
SCIM provisioning tab will appear automatically in the menu.Role mapping
In the table of the SCIM provisioning tab, you can see the groups created in the identity manager. This happens because a one-way sync has been established, from the identity manager to the platform. To map roles:- Go to Organization → SCIM provisioning.
- Select a synced group from the table.
- In the modal window, assign the corresponding role.
- If an organization (tenant) has sub-organizations, choose which sub-organization the group belongs to before assigning a role.
Considerations about roles
- Every synced group must have a role assigned so that its users are visible and functional.
- The same role can be assigned to different groups.
- The role assigned to a group can be modified at any time by following the same steps used to assign the role.
- In the Users list, the Created by and Updated by columns will be shown to identify users managed by SCIM.
Role sync
The sync frequency depends on the identity manager used (for example, Entra ID syncs every 40 minutes), although it is possible to force a manual sync from the identity manager itself to perform tests or urgent changes without waiting for the automatic cycle. To avoid depending on those intervals, the platform includes the Sync assigned roles button, which lets you align the roles of users belonging to groups created with SCIM. This action performs the following operations:- Reviews all users belonging to groups created via SCIM.
- Checks whether the role assigned to each user matches the role mapped for their group.
- If it detects discrepancies, it automatically updates the user’s role.
It is not necessary to run the
Sync assigned roles action on a regular basis. It is recommended to use it only when a change is made to the mapped roles.API keys
Shows a table with the list of API keys created in the organization. The fields contain the following information:- Name. Name assigned to the API key.
- Status. Can be Active, Expired, or Revoked.
- Key ID. ID corresponding to the API key.
- Role. Role of the user who will access the API.
- Creation date. Date and time the key was created.
- Expiration date. Date and time the key expires.
- Revocation date. If it has been revoked, revocation date and time.
Create an API key
- Go to Organization → API keys.
- Click Create API key.
-
Fill in the form:
- Name. API key identifier.
- Role. Role assigned to the user.
- Duration. Key validity period.
- Click Save.