Requirements
Flexxible Assist is available on workspaces with any of the following operating systems:- Windows 10 1809 or higher
- Windows Server 2019 or higher
- Fedora 40 or higher
- Ubuntu 22.04 or higher
- Debian 12 or higher
- macOS 15 or higher
Unlike Remote Assistance (FRA), which is only available on Windows systems, Flexxible Assist is cross-platform.
Configuration
Flexxible Assist can be configured at the Organization or Reporting group level.Organization
- Go to Settings → Organization.
- In the side menu, expand Remote Assistance.
- Select the desired configuration block: Flexxible Assist · Assistance capabilities, Media, Clipboard, File transfer, Administrator toolkit, Teammate (AI), Technician branding, or Logo and icons.
In this same menu, General contains options shared between Flexxible Assist and Remote Assistance (FRA) (for example, the preferred technology), and FRA corresponds specifically to the Remote Assistance (FRA) configuration. See details on the launcher page.
Reporting groups
Each reporting group can edit its own Flexxible Assist configuration to suit its needs.- Go to Settings → Reporting groups.
- In the row of the desired reporting group, click the actions menu (···).
- Select Remote Assistance.
Logo and icons is the exception: it is only configured at the Organization level and is not available per Reporting group.
All configuration changes are recorded in the audit log. From Settings → Organization, the View audit logs button (at the top of the page) lets you view them.
Assistance capabilities
- Input lock. Locks the keyboard and mouse of the assisted device for the duration of the session.
- Chat. Enables text chat between the operator and the user during the session.
- Chat transcript. Saves a transcript of the session chat.
- Video quality. Defines the streaming quality: Low bandwidth, Standard, Sharp, or Ultra.
Media
- Operator webcam. Allows sharing the operator’s webcam during the session.
- Operator microphone. Allows sharing the operator’s microphone during the session.
- Device webcam. Allows access to the assisted device’s webcam.
- Device microphone. Allows access to the assisted device’s microphone.
Clipboard
- Clipboard to device. Allows sending content from the operator’s clipboard to the assisted device.
- Clipboard from device. Allows copying content from the assisted device’s clipboard to the operator.
File transfer
- Upload files. Allows uploading files from the operator’s computer to the assisted device.
- Download files. Allows downloading files from the assisted device.
- File-only sessions. Restricts the session to file transfer, without remote screen control.
- Silent file management. Allows managing files without notifying the user of the assisted device.
- Manage files. Enables file management actions, in addition to uploading and downloading.
- Allowed path prefixes. Restricts file transfer to specific paths on the device (for example,
C:\Users\Public). - Maximum upload / download bytes. Size limit, in bytes, per upload and download transfer.
Administrator toolkit
- Preset tools. Enables, in the Administration tools panel, the 4 shortcuts already available in Remote Assistance (FRA): Command Prompt (CMD), PowerShell, Task Manager, and Registry Editor, all run with SYSTEM permissions even if the user does not have them in their session.
- Run arbitrary commands. Allows the operator to type and run any command, not limited to the 4 preset shortcuts, from the same panel, with SYSTEM permissions and the result visible on the remote screen.
AI Teammate
Flexxible Assist includes Assist Teammate, an AI assistant that can join the session to help diagnose and solve the problem. Available modes:- Observe. Watches the screen and summarizes what is happening.
- Guide. Points on the screen and suggests the next steps, without touching anything.
- Act. (scope pending detail)
Teammate cost
To contract Teammate consumption beyond the free period, contact the Partner who manages your account.
- Teammate maximum mode. Maximum Teammate level allowed in the session: Observe, Guide, or Act.
- Teammate run command. (pending detail)
- Teammate auto-start. Mode in which Teammate starts automatically when the session begins, or whether it does not start automatically.
- Technician can disable Teammate. Allows the technician to disable Teammate during the session.
Technician branding
Allows customizing, per language, the texts the end user sees during the session:- Consent title. Default: “Remote assistance request”.
- Consent message. Text shown in the consent dialog box.
- Panel title. Default: “Flexxible Assist”.
- Technician connected message. Default: “Support connected”.
- Input locked message. Text shown while the device input is locked.
- Chat legal notice. Text shown when the chat transcript is being recorded.
Logo and icons
Allows customizing the branding the end user sees during the session, by uploading a file for each variant:- Logo (light).
- Logo (dark).
- Icon (light).
- Icon (dark).
This block is only available at the Organization level; it cannot be configured per Reporting group.
Remote session flow
From the user’s device
- The user receives the remote assistance request (“Remote assistance request”) and must choose Allow or Deny.
- After accepting, a floating Flexxible Assist panel appears with the status “A remote assistance session is connected” and the Chat and Disconnect buttons.
From the operator’s side
While the user has not responded, the operator sees the message “Waiting for the user to accept…”. During the session, the operator has a toolbar with:- Scaling. Adjusts the remote view, with the option to click to fill.
- Enable view only. Read-only mode, without control of the device.
- Keyboard. Quick combinations (Ctrl+Alt+Del, Ctrl+Shift+Esc, Win+L, Win, Win+R, Win+E, Win+D, Alt+Tab, Alt+F4, Print Screen) and creation of custom combinations with Ctrl, Alt, Shift, Win, and AltGr.
- File transfer. Dual-pane explorer (local computer / remote device), subject to the configured allowed paths.
- Administration tools. Running commands on the remote device.
- Chat. Messaging with the user; messages are not kept when the session ends.
- Teammate. Activation of the AI teammate (Observe / Guide).
End of session
- If there is no interactive session available on the device, the error “Connection rejected by the user” is shown, indicating that the session must be reopened from Flexxible Portal.
- When the session ends, “Session closed” is shown, indicating that Flexxible Assist must be reopened from Flexxible Portal to start another session.
Session log
Each Flexxible Assist session is recorded as an operation, visible in Operations.- List. Each session appears as “Flexxible assist session to ‘<workspace name>’”, with the operation type Flexxible Assistant and its status (Finished, Error, or Cancelled).
-
Detail → Events. Chronological log of the actions performed during the session, for example clipboard usage (
Feature usage: clipboard_from_device used, indicating the content type:image/png,text/plain, etc.) or tool launches (Tool launched: command launched "C:\Windows\system32\cmd.exe" /k "cmd"). -
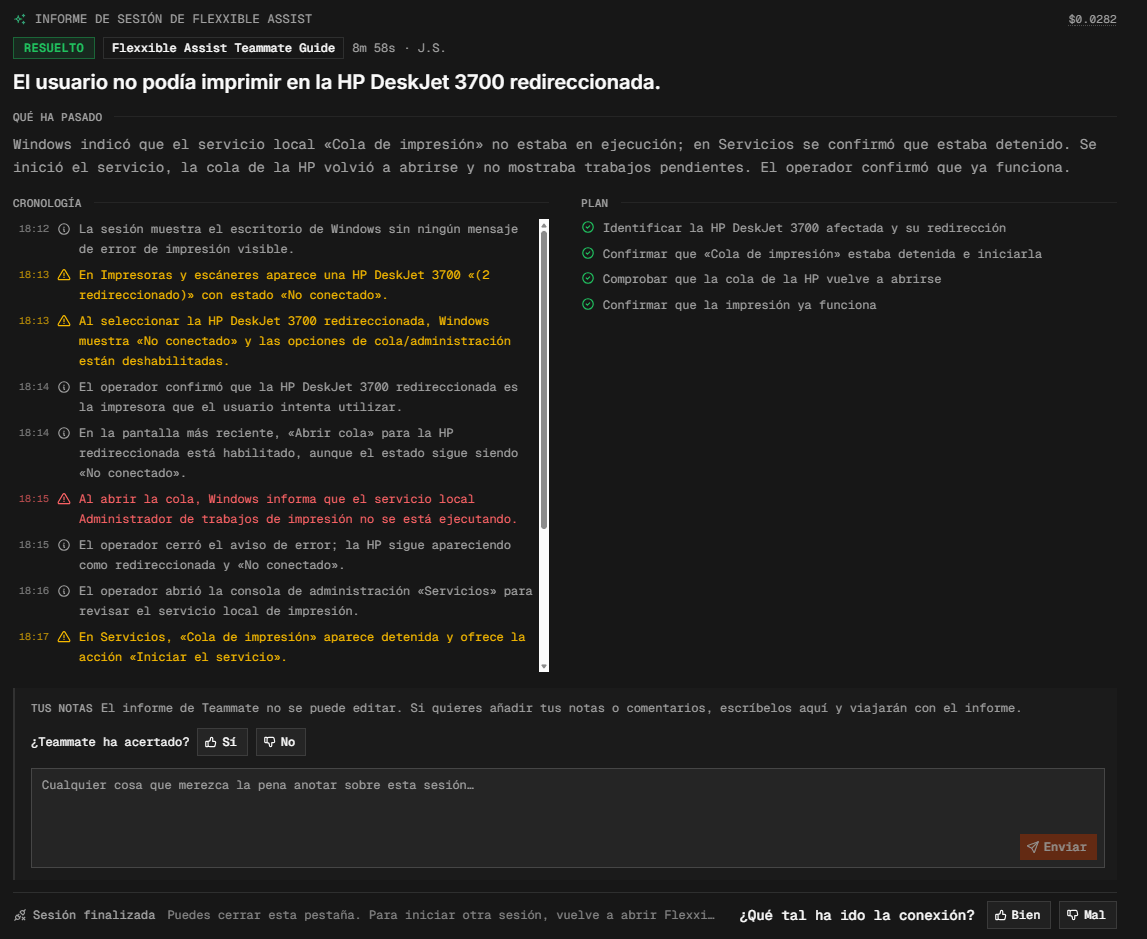
Teammate session report. If Teammate is activated in Observe or Guide mode during the session, a report with the session summary is generated when the assistance ends: a header with the cost, the status (for example, Unresolved or Resolved), the mode used, the duration, and the technician’s initials; a title summarizing the reason for the assistance; a “What happened” paragraph; and the timeline of actions performed by the operator, with timestamps. In Guide mode, the report also adds a Plan column with the planned steps and their completion status. The report cannot be edited, but you can add additional notes, and rate whether Teammate got it right (Yes / No) and how the connection went (Good / Bad).