> ## Documentation Index
> Fetch the complete documentation index at: https://docs.flexxible.com/llms.txt
> Use this file to discover all available pages before exploring further.
# Deploy on Windows with Intune
> Guide for deploying FlexxAgent with Microsoft Intune
FlexxAgent can be deployed centrally through Microsoft Intune, allowing administrators to distribute, install, and manage the agent on Windows devices within the organization.
Using Intune makes it easier to automate the installation process and apply management policies to devices, especially in corporate environments with large numbers of computers.
Before starting the deployment process, we recommend reviewing the [FlexxAgent documentation](../flexxagent/systems/windows) to understand the agent's requirements and configuration options.
## Requirements
Before starting the deployment, the following requirements must be met:
* If you want to install FlexxAgent and the device already has FlexxAgent installed, you must uninstall the latter before continuing.
* Microsoft Windows 10 version 1607 or later operating system
* Devices must be enrolled in Microsoft Intune and added to Active Directory in one of the following configurations:
* Registered in Azure Entra ID (mainly in Bring your own device environments)
* Joined to Azure Entra ID (also known as Joined device)
* Joined to a hybrid environment (AD / Azure Entra ID)
* The Microsoft Win32 Content Prep Tool is required.
## Deployment steps
### 1. Download the FlexxAgent installer
Download FlexxAgent from the platform and obtain the following files:
* `.msi` installer.
* `.conf` configuration file.
For more information about the download process, see [this link](../flexxagent/systems/windows).
### 2. Create the installation package in `.intunewin` format
* Unzip the agent installation package into a local folder.
* Download the **Microsoft Win32 Prep Tool**. For more information, see [Prepare a Win32 app to be uploaded to Microsoft Intune](https://learn.microsoft.com/en-us/intune/intune-service/apps/apps-win32-prepare).
* Create an empty folder to store the generated package. For example: `C:\Temp\FlexxAgent-Installer-output`.
* Create the installation package. In this example, it was unzipped in `C:\Temp\FlexxAgent-Installer`.
* Use the **IntuneWinAppUtil.exe** tool (Microsoft Win32 Content Prep Tool) to convert the installer into an Intune package.
* Confirm that the package has been created correctly.
* The created package will be used to deploy an application in Microsoft Intune.
 ### 3. Create the application in Intune
* Sign in to the Intune admin center.
* Go to **Apps** → **All Apps**.
* Select **+ Add**
* Choose Windows app (Win32) as the application type.
* On the **App information** tab, click **Select app package file** and select the `.intunewin` package previously created.
* Enter the application information:
* **Name**: FlexxAgent-Installer standalone
* **Publisher**: Flexxible
* **App version**: This information is provided in the properties of the `FlexxAgent.Installer.msi` file.
### 4. Configure the installation
On the **Program** tab, configure the install and uninstall commands.
For example, if the configuration file is named `settings.conf`:
* **Install command**
```
msiexec /qn /i "FlexxAgent.Installer.msi" AGENT_CONFIG=".\settings.conf"
```
The install command must be adapted to the actual paths and filenames included in the package. The configuration file path is mandatory and must point to the `.conf` file to be used during installation.
* **Uninstall command**
```
msiexec /qn /passive /x "{6F330B47-2577-43AD-9095-18614A74D82F}"
```
The double quotes are mandatory.
* **Install behavior**: System
* **Device restart behavior**: No specific action
### 5. Configure a proxy (optional)
If the environment uses a proxy server to access the Internet, the configuration must be done before installing the agent by modifying the downloaded `.conf` file.
In the \[Agent/Network] section, add a line in the corresponding format:
#### Unauthenticated proxy
* proxy = `http://proxy_uri:port`
* Example: proxy = `http://192.168.0.100:443`
#### Authenticated proxy
* proxy = `http://user:password@proxy_uri:port`
* Example: proxy = `http://proxy_user:xxxxxxxx@192.168.0.100:443`
### 6. Configure system requirements
On the **Requirements** tab, include information about the operating system architecture:
* **Operating system architecture**: 64-bit
* **Minimum operating system**: Select according to the version used in the current installation (device fleet). For example, the minimum: Windows 10 1607
### 7. Configure the detection rules
* On the **Detection Rules** tab, select **Manually configure detection rules**.
* Click **+Add**.
* Set the following values:
* **Rule type**: File
* **Path**: `%ProgramFiles%\Flexxible\FlexxAgentUniversal`
* **File or folder**: `FlexxAgent.Universal.exe`
* **Detection method**: File or folder exists
* **Associated with a 32-bit app on 64-bit clientsA**: No
### 8. Assign the application
On the **Assigments** tab, create an Azure Entra ID security group containing the devices on which this package will be installed.
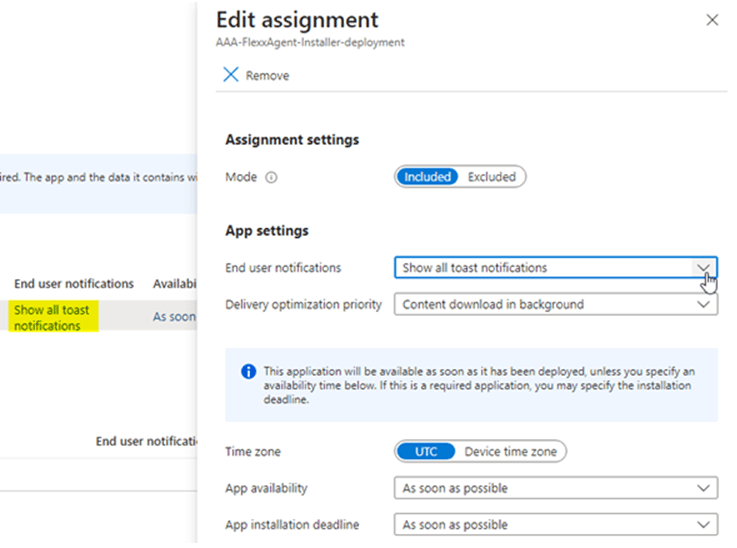
### 9. Configure the notification for the user
Select the appropriate notification to be shown to the end user.
### 3. Create the application in Intune
* Sign in to the Intune admin center.
* Go to **Apps** → **All Apps**.
* Select **+ Add**
* Choose Windows app (Win32) as the application type.
* On the **App information** tab, click **Select app package file** and select the `.intunewin` package previously created.
* Enter the application information:
* **Name**: FlexxAgent-Installer standalone
* **Publisher**: Flexxible
* **App version**: This information is provided in the properties of the `FlexxAgent.Installer.msi` file.
### 4. Configure the installation
On the **Program** tab, configure the install and uninstall commands.
For example, if the configuration file is named `settings.conf`:
* **Install command**
```
msiexec /qn /i "FlexxAgent.Installer.msi" AGENT_CONFIG=".\settings.conf"
```
The install command must be adapted to the actual paths and filenames included in the package. The configuration file path is mandatory and must point to the `.conf` file to be used during installation.
* **Uninstall command**
```
msiexec /qn /passive /x "{6F330B47-2577-43AD-9095-18614A74D82F}"
```
The double quotes are mandatory.
* **Install behavior**: System
* **Device restart behavior**: No specific action
### 5. Configure a proxy (optional)
If the environment uses a proxy server to access the Internet, the configuration must be done before installing the agent by modifying the downloaded `.conf` file.
In the \[Agent/Network] section, add a line in the corresponding format:
#### Unauthenticated proxy
* proxy = `http://proxy_uri:port`
* Example: proxy = `http://192.168.0.100:443`
#### Authenticated proxy
* proxy = `http://user:password@proxy_uri:port`
* Example: proxy = `http://proxy_user:xxxxxxxx@192.168.0.100:443`
### 6. Configure system requirements
On the **Requirements** tab, include information about the operating system architecture:
* **Operating system architecture**: 64-bit
* **Minimum operating system**: Select according to the version used in the current installation (device fleet). For example, the minimum: Windows 10 1607
### 7. Configure the detection rules
* On the **Detection Rules** tab, select **Manually configure detection rules**.
* Click **+Add**.
* Set the following values:
* **Rule type**: File
* **Path**: `%ProgramFiles%\Flexxible\FlexxAgentUniversal`
* **File or folder**: `FlexxAgent.Universal.exe`
* **Detection method**: File or folder exists
* **Associated with a 32-bit app on 64-bit clientsA**: No
### 8. Assign the application
On the **Assigments** tab, create an Azure Entra ID security group containing the devices on which this package will be installed.
### 9. Configure the notification for the user
Select the appropriate notification to be shown to the end user.
 ### 10. Select the target devices
You can choose between:
* **+Add all devices**, to deploy the application to all devices enrolled in Intune.
* Select a specific group of devices where the deployment will take place.
### 11. Start the deployment
Once the configuration is complete, click **Review+Create** to start the deployment.
The process may take up to an hour to start being applied to the devices.
Once the configuration is complete, Microsoft Intune will distribute FlexxAgent to the assigned devices.
### 10. Select the target devices
You can choose between:
* **+Add all devices**, to deploy the application to all devices enrolled in Intune.
* Select a specific group of devices where the deployment will take place.
### 11. Start the deployment
Once the configuration is complete, click **Review+Create** to start the deployment.
The process may take up to an hour to start being applied to the devices.
Once the configuration is complete, Microsoft Intune will distribute FlexxAgent to the assigned devices.